Tag Archives: Easy DICOM Viewer

Easy DICOM Viewer – anonymizing tags with Japanese character values

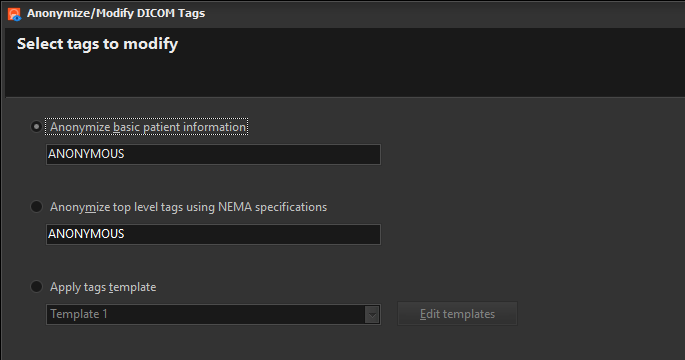
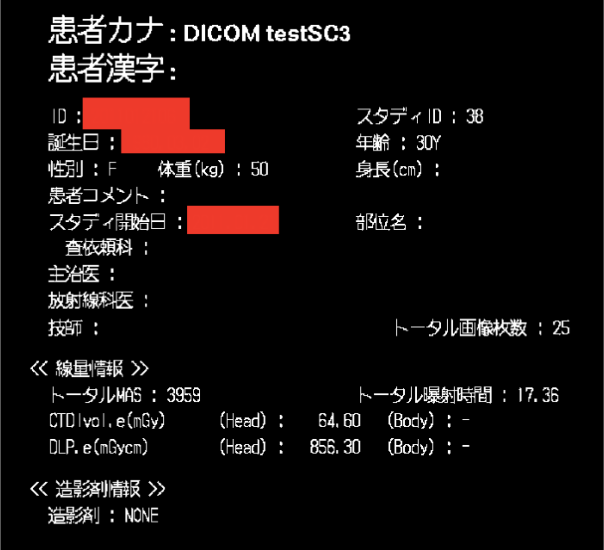
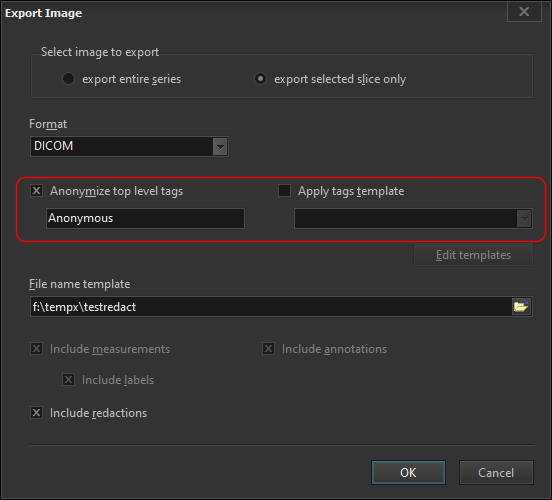
In Easy DICOM Viewer, you can anonymize the DICOM tags in a series of images.

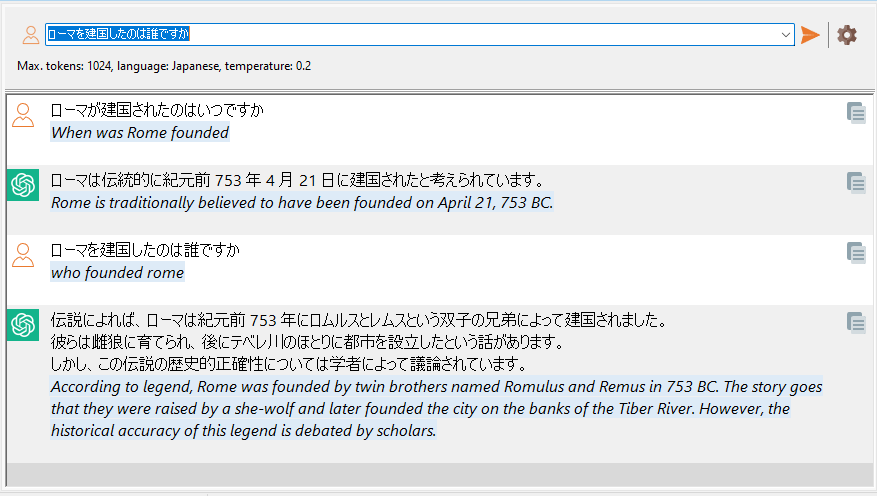
Prior to version 5.3, you could not modify the tag values to include Japanese characters.  From version 5.3 onwards, this is now possible.

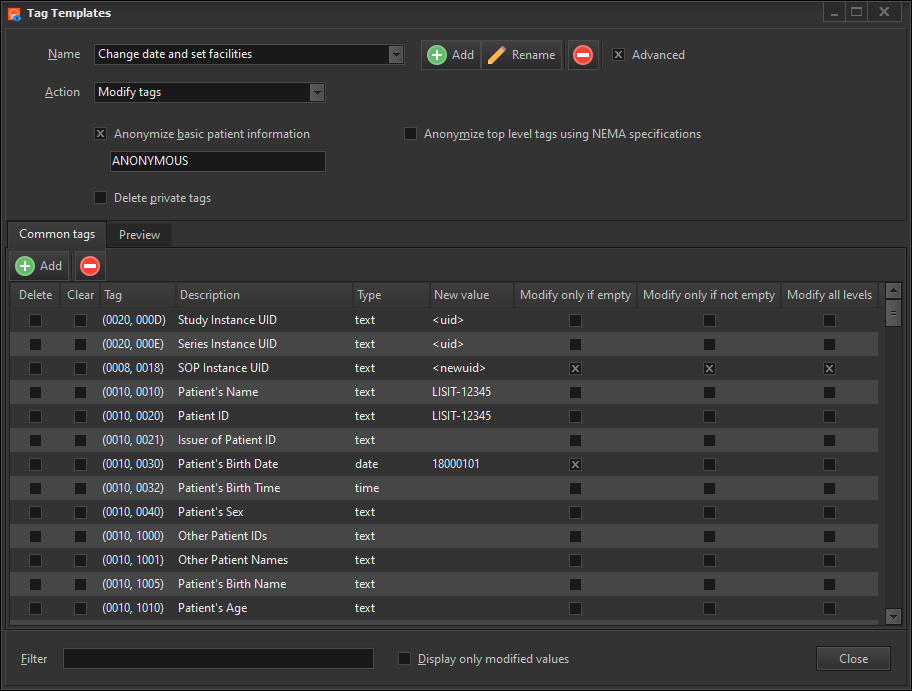
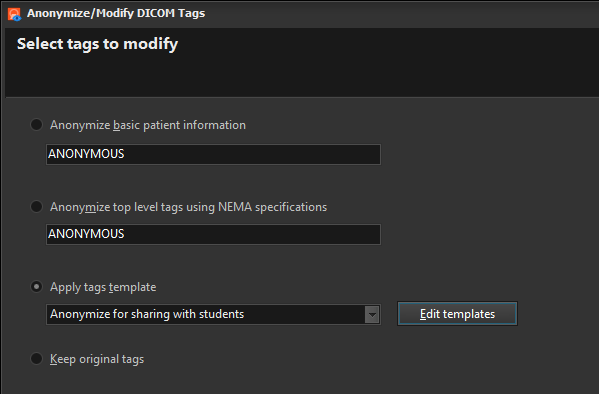
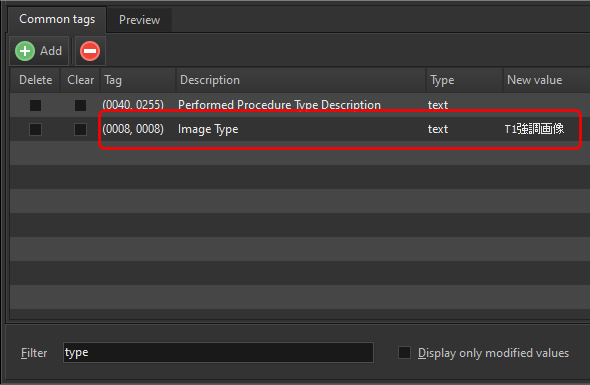
For example, say you want to modify the Image Type tag (0008,0008) value to T1強調画像 (T1 weighted image).  First, create a new tags template or use an existing template.  A list of the most commonly used tags are displayed.

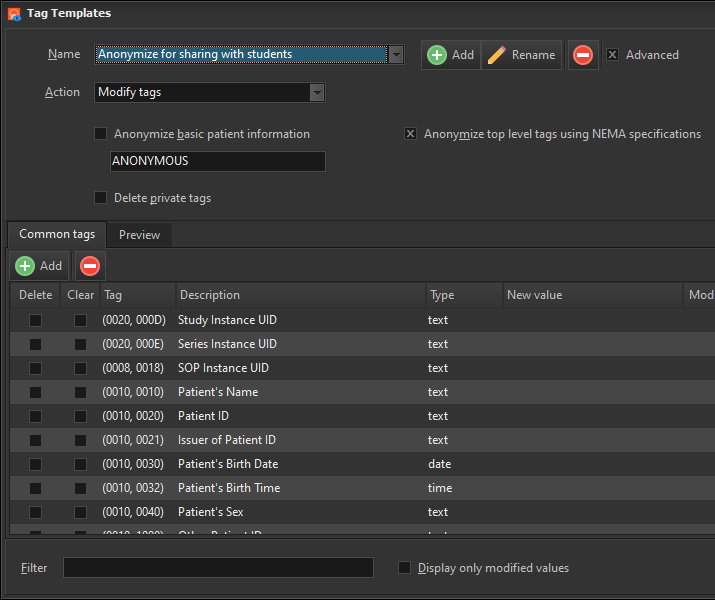
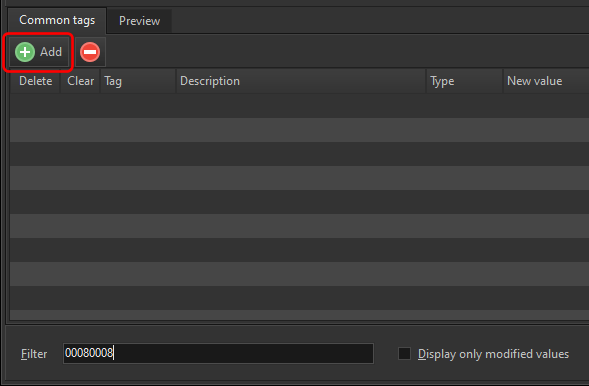
To check if Image Type is on the list, you can enter the tag value in the Filter area.

No results are displayed, meaning the tag isn’t on the list.  You could also have entered a partial description, e.g. type

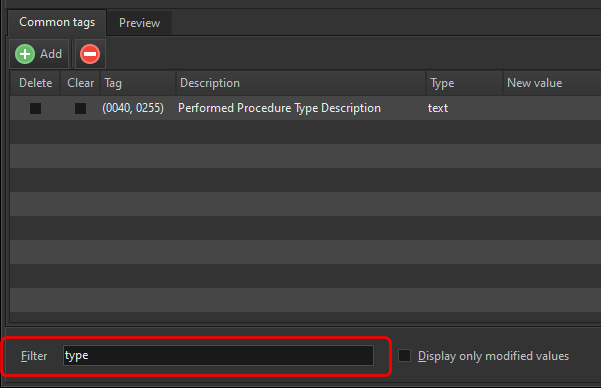
A tag containing type is displayed, but it isn’t the tag we want.  To add a new tag, click on the Add button.

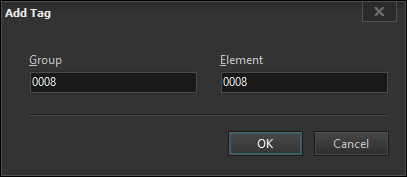
Enter the group and element value.

The new tag is then added to the list, and you can enter the value you want to use.

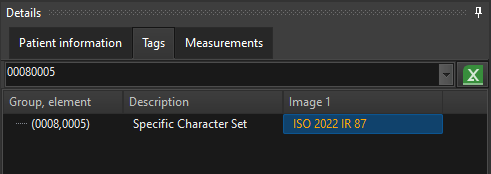
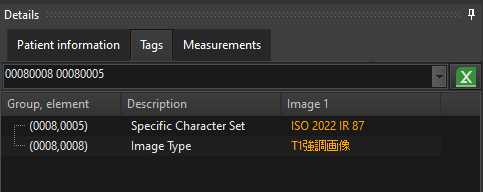
Another thing to note when using Japanese text is to ensure that your Specific Character Set tag (0008,0005) contains the value ISO 2022 IR 87.  You can check this in the Tags viewer in Easy DICOM Viewer.

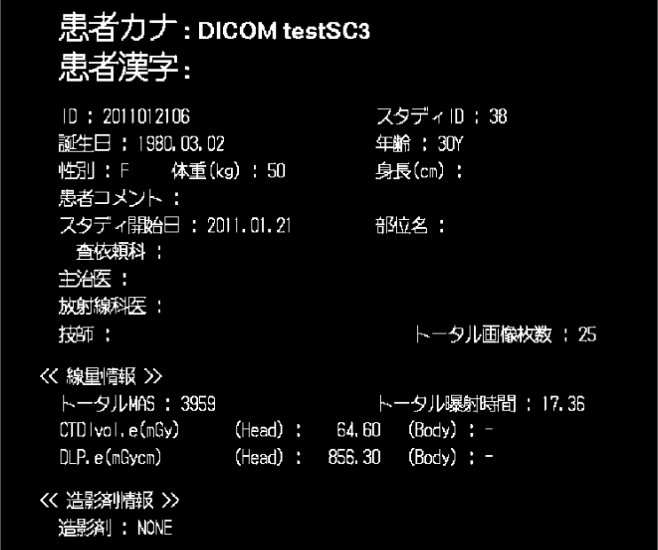
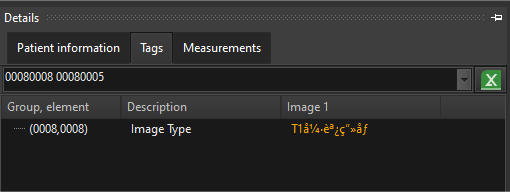
If the image’s character set does not have this value, the tag value would be displayed  incorrectly.

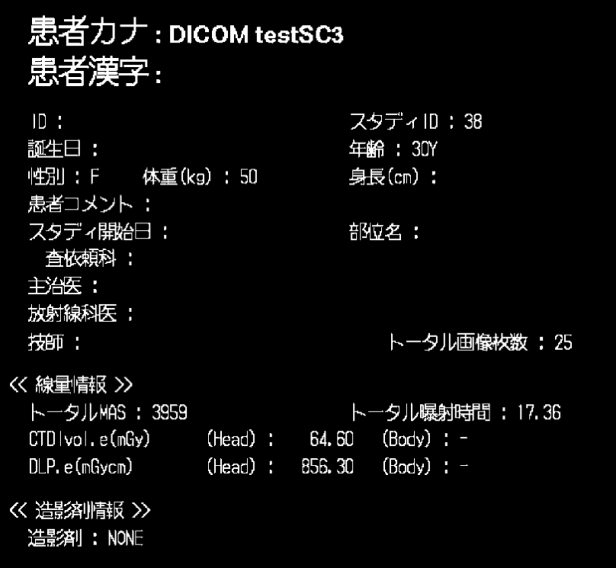
With the correct value for Specific Character Set, the tag value is displayed correctly.

If you would like us to support additional character sets, please drop us a line at support@yohz.com.

Download a 14-day trial of Easy DICOM Viewer now to easily anonymize or modify your DICOM images’ tag values.

ChatGPT integration

We recently added the option to ‘chat’ with ChatGPT in Easy DICOM Viewer and Easy PDF Search, as these 2 products are used in research settings and having the ability to obtain answers from ChatGPT within the product was a useful feature.

What advantage does our ChatGPT integration offer over simply opening a browser session and connecting to the ChatGPT server?

Chat session organization

You can start multiple chat sessions and organize them by categories.   You can define as many categories and start as many chat sessions as you require.

Chat session persistence

All your chat sessions are automatically restored when you open the application.  This ensures you never lose any of your previous chat responses.

Customizable display

There are also various settings you can use to customize and display the chat session.

Per-chat settings

For each chat session, you can change settings like the maximum tokens, input language and response temperature.

This gives you better control over how ChatGPT responds to your queries.

Multi-language support

You can use different languages in our ChatGPT integration.  We use Google Translate to translate your questions and the responses.  For e.g. this is a sample chat session where the questions were entered in Japanese, and the responses translated to Japanese from English.

Of course, you can also choose to display the English translations.

If you want to give our ChatGPT integration a try, download a free 14-day trial of Easy PDF Search or Easy DICOM Viewer now.

See also:


Getting your ChatGPT API key

To use the ChatGPT UI in our products, you need to provide an API token.

You will need to first create an account with OpenAI, using this URL (https://chat.openai.com/auth/login).

Once your account has been created and validated, open this URL (https://platform.openai.com/) to create your API token.

Click on the account settings on the top right, then click on the View API keys item.

On the next page, click on the Create new secret key button to generate a new key.

Enter a description for the key, then click on the Create secret key button:

A new key is then created for you.

Copy and paste this value into the API token field in the Chat Settings window.

See also:


Creating contact sheets in Easy DICOM Viewer

In Easy DICOM Viewer 5, you can now create contact sheets from images containing multiple slices/frames.

Say we have a series containing 94 slices.

We want to export all 94 images into a single PNG file.  When we choose the Export Image action, we select the Create contact sheet option.

Once exported, our PNG file looks like this:

You have full control over how the images are rendered.  You define how many columns to use, the size of each image, the background color, and the footer value.

What exactly is the footer value?  It’s whatever value you want displayed at the bottom of each image.  It can be static text, which isn’t very useful, or it can be one or more DICOM tag values.

For e.g. let’s say we want to display the slice location at the bottom of each image.  The tag we want is 0020, 1041.  We simply enter this value as the footer value e.g.

When we now export the PNG contact sheet, the slice location is displayed on the bottom of each thumbnail.

We could of course add some label to the value.  Say we add the label Location: to the value e.g.

resulting in this:

Download a 14-day trial of Easy DICOM Viewer now, and see how you can easily identify which images require your attention.

Easy DICOM Viewer is a collaborative effort between LISIT, Co., Ltd. and Yohz Software.  To learn more about Easy DICOM Viewer or download a trial, please use this link.  If you are in Japan, please use this link instead.

See also:

Anonymization options in Easy DICOM Viewer

Easy DICOM Viewer can be used to anonymize DICOM tag values in your DICOM files.  There are 3 options you can select:

Anonymize basic patient information

This option anonymizes the most basic DICOM tags, which are the following:

  • patient’s name (0010, 0010)
  • patient ID (0010, 0020)
  • patient birth date (0010, 0030)
  • patient’s age (0010, 1010)
  • patient’s sex (0010, 0040)
  • comment (0010, 4000)
  • institution name (0008, 0080)
  • institution address (0008, 0081)
  • institution department (0008, 1040)
  • Issuer of Patient ID (0010, 0021)
  • study description (0008, 1030)
  • series description (0008, 103E)
  • operator’s name (0008, 1070)
  • referring physician’s name (0008, 0090)
  • physician(s) of record (0008, 1048)

Anonymize top level tags using NEMA specification

This option anonymizes tags using the recommendations outlined in this link – http://dicom.nema.org/dicom/2013/output/chtml/part15/chapter_E.html#table_E.1-1.

Compared to the basic anonymization option above, this option anonymizes a lot more details.

Apply tags template

This option lets you apply a tags template to the selected images.  A tags template is a set of changes you want to apply to the DICOM tags.  You can create multiple templates for different purposes e.g. one template to modify certain tags to a specific value, another template to erase only patient details, and yet another tag to modify all patient, doctor and study details.

The Preview window will then show you how the tag values would appear in the modified images.

These 3 options give you complete flexibility as to how you want to anonymize the DICOM tags in your images.

Download a 14-day trial of Easy DICOM Viewer now, and see how you can easily identify which images require your attention.

Easy DICOM Viewer is a collaborative effort between LISIT, Co., Ltd. and Yohz Software.  To learn more about Easy DICOM Viewer or download a trial, please use this link.  If you are in Japan, please use this link instead.

See also:

Improvements for stored measurements in Easy DICOM Viewer 5.1

In Easy DICOM Viewer, stored measurements are displayed in the Measurements panel on the right.

In version 5.1, you can now add headers to this panel, to group the stored measurements e.g.

Click on the Add header button on the Measurements toolbar to create your headers.

You can now also edit the stored measurement details e.g.

For now, you are limited to 8 lines of text.  We will improve this if there are user requests.

When you then export the measurements to Word or HTML pages, the headers and custom text are displayed accordingly.

Download a 14-day trial of Easy DICOM Viewer now, and see how you can easily identify which images require your attention.

Easy DICOM Viewer is a collaborative effort between LISIT, Co., Ltd. and Yohz Software.  To learn more about Easy DICOM Viewer or download a trial, please use this link.  If you are in Japan, please use this link instead.

See also:

Patient status in Easy DICOM Viewer

Easy DICOM Viewer 4.7 lets you define statuses for each series of images.  A series can have an unread, reading, or completed status, as indicated by the colored circles.

In this way, you can easily identify images that require your attention.  You can easily filter the images in the patient history list by their status using the status filter:

You change the status of the series’ images when you open the series.  In the Patient information tab. select the status you want to apply to the series:

Download a 14-day trial of Easy DICOM Viewer now, and see how you can easily identify which images require your attention.

Easy DICOM Viewer is a collaborative effort between LISIT, Co., Ltd. and Yohz Software.  To learn more about Easy DICOM Viewer or download a trial, please use this link.  If you are in Japan, please use this link instead.

See also:

Improved redaction in Easy DICOM Viewer

In Easy DICOM Viewer 4.8, redacting an image and saving the redacted DICOM file now preserves the HU values in the image.

DICOM images may sometimes contain patient data burned into the image e.g.

Easy DICOM Viewer lets you redact areas of the image you want to keep private using the redaction function.  For example, say we want to hide the details that indicate the patient’s birth date:

You can then export the DICOM image with the redaction applied.

The modified image will preserve the original HU values and DICOM tags where possible.  Note that during the export process, you can also choose to anonymize the DICOM tags.

Download a 14-day trial of Easy DICOM Viewer now and experience how easy it is to redact your images and anonymize the DICOM tags.

Easy DICOM Viewer is a collaborative effort between LISIT, Co., Ltd. and Yohz Software.  To learn more about Easy DICOM Viewer or download a trial, please use this link.  If you are in Japan, please use this link instead.

See also:

Converting Micro-CT TIFF images to DICOM files

We recently had a user who needed to convert Micro-CT scans consisting of TIFF images to DICOM files.  Easy DICOM Viewer could already convert most graphic files to DICOM, so we thought it would not be a problem.  Turned out to be a big problem.

Usability

First up was the usability issue.  Micro-CT scans are high-resolution images, running into hundreds to thousands of files.  In the original conversion screen, you had to drag the images you wanted to convert onto the DICOM image frames window.

This worked fine if you only had less than a hundred images or so, or when you needed to combine images from different folders.  However, for Micro-CT images, having to show a preview for hundreds or thousands of images was simply not feasible.  Thus, we removed the need to have to display the images in the frames window.  You can now start the conversion in the image browser window itself.

In addition, the image browser now lists the files by file names by default, which makes this screen more responsive.  You can of course still toggle between thumbnails and file names modes.

Also, if you now dropped a large number of files on to the DICOM image frames window, Easy DICOM Viewer will ask you to confirm that you want to proceed with the action.

With all the above changes, you can now easily convert Micro-CT scans into DICOM images very much faster compared to the previous version of Easy DICOM Viewer.

DICOM image properties

The main change here was to add the compression options for the converted DICOM images.  This allowed the user to generate smaller DICOM files, depending on their needs.

Other changes we made was to easily resize images by percentage, and also to convert the images to 16-bit grayscale.

With all the above improvements, you can now easily convert Micro-CT TIFF images to a single, smaller DICOM file.  Download a 14-day trial of Easy DICOM Viewer now and give it a try.

See also:


Presenter mode in Easy DICOM Viewer

In Easy DICOM Viewer 4.1, we introduced a presenter mode to help you share images in presentations and zoom meetings while maintaining confidentiality of your images.

Anonymized tag values

In presenter mode,  sensitive tag values are automatically anonymized.  For e.g. in the image list, you would usually see the patient name:

In presenter mode, this is replaced by a generic label:

In the image itself, information profiles like these:

are replaced with anonymized values:

In the tags listing, these values are also anonymized.

Highlighted cursor position

In presenter mode, the cursor position is highlighted so that your audience can track your cursor position easily.

Customizing presenter mode

You can customize the presenter mode settings to fit your requirements.  For e.g. you may want to anonymize additional tags, or customize the appearance of the cursor highlight.

Setting the presenter mode

Turn presenter mode on by selecting the Presenter mode option from the Application item on the tool bar.

Summary

Easy DICOM Viewer‘s presenter mode allows you to present/screen share images easily without worrying about exposing confidential information.  Your images are unchanged – only the displayed values are modified.  This is a huge time saving over the previous practice where you had to anonymize the tag values before using them in any presentations.

Download a 14-day trial of Easy DICOM Viewer now and experience how the presenter mode makes it easy to display DICOM images without exposing any confidential information.

See also: