Monthly Archives: April 2021

Using Access OLE Import

Access OLE Import is a Windows application that uploads files into OLE Object-type fields in your databases.  Most of the time, we are uploading into Access databases, but it can also be  client server databases like SQL Server, PostgreSQL, MariaDB/MySQL because Access is popularly used as a front-end to these databases.

Backup, backup, backup

The first step is the most important – back up your database first.  Access OLE Import makes changes to your tables, and having a backup lets you revert to a working database if anything goes wrong.

Preparing the data file

The next step is to prepare a data file.  This is an Excel worksheet containing the data to upload.  If you only want to insert files into a table, your data file would contain a single column, where the column header defines the field name to upload into and the filecontent identifier so that Access OLE Import will upload the contents of the listed files.  E.g.

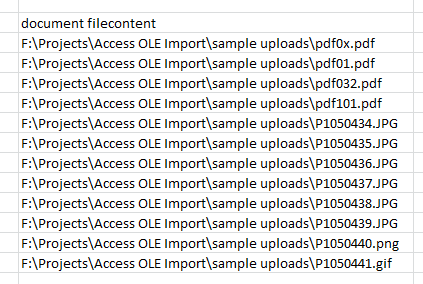
Here, we want to upload the contents of the listed files into the document field.

If we want to update existing rows, we will need to provide one or more key values e.g.

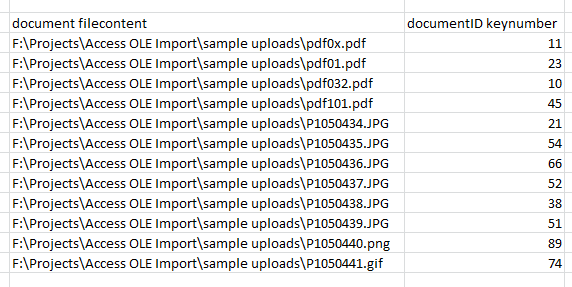
Here, we are providing the definition that documentID is an integer-type key value.

Note that you can also use Libre Office or Open Office to create the data file.  You just need to save the spreadsheet in the Excel format (xlsx or xls).

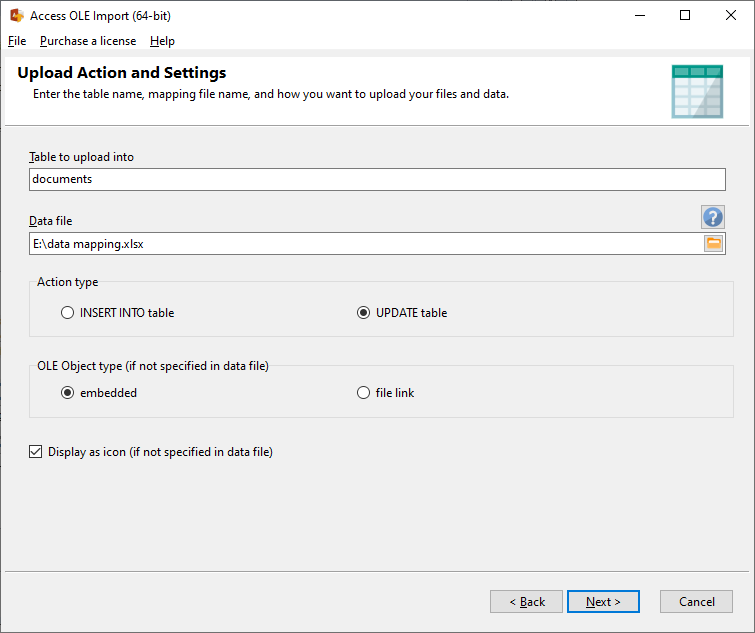
Run the Upload Wizard

Probably the easiest step.  Connect to your database, enter the name of the table you want to upload into, select the data file, upload type, object type, and you’re done.

See also:

Introducing Access OLE Import

Access OLE Import is our new product that helps you upload files into OLE Object-type fields in Access and most major database engines (SQL Server, PostgreSQL, MariaDB/MySQL etc), for use in the following scenarios:

  • you are migrating data to a database that uses OLE Object fields
    E.g. you have a new customer that require their data to be migrated to OLE Object fields in your database.  Access OLE Import can upload the files into those fields easily.
  • you need to modify the existing data then upload the changes back into the tables
    E.g. you want to extract images from your database, then resize/add watermarks, then upload these updated images.  Use SQL Image Viewer to extract the images, modify them, then use Access OLE Import to upload the files.
  • you need to update file links in the OLE Object fields
    E.g. you have existing file links that are no longer valid, and want to update those file links.  Access OLE Import can upload file links as well as embedded files.
  • you want to convert embedded content to file links in OLE Object fields
    Use Access OLE Import to easily upload file links to replace the existing embedded content.

You can read more about Access OLE Import on this page, or download a 14-day trial.

See also:

Locking data sets in SQL Image Viewer

We recently fixed a bug in SQL Image Viewer where locking data sets was not working and resulted in errors.  It would seem that not many users are aware of this useful feature, so here’s more details on what locking does.

When you run a query and want to keep the results but need to run another query, your options in most SQL tools is to set up another connection and run the other query.  Or run another instance of the application to be able to run the other query.

In SQL Image Viewer, you can lock the current data set so that it is not replaced by the results of the new query.  Say we want to keep this data set containing 99 rows in SQL Image Viewer:

Click on the Lock data set button to keep that data set.

Once we do that, the page caption changes to indicate the data set has been locked.

Now when we run our other query, its results is displayed on a different tab.

We can then easily switch between the 2 data sets to view/compare the results.  You can lock as many data sets as you require, subject to having enough storage on your computer.

To unlock a data set, select the data set, then click on the Unlock data set button button.  The data set will be immediately released and closed.

So basically locking allows you to persist data sets across queries, instead of having to create additional sessions.

Copying files from different folders to one folder easily

There may be instances where you want to copy files from different folders to another folder.  For e.g. say we want to copy 3 files from 3 different folders to another folder:

Using Windows Explorer, we would need to open each folder in turn and copy the file to our target folder.  If the files were large, we would need to wait for each copy to complete before proceeding to the next file.

In Easy Explorer, we can use the drop stacks feature to copy all 3 files in one go.

First, we need to display the tools panel by selecting the Windows > Display tools panel item from the main menu, or press CONTROL-O.

The tools panel is displayed on the bottom.  Click on the Drop stack tab to open it.

Now we can drag and drop each file we want to copy into the drop stack area.

Once we have all the files we want to copy in the drop stack area, we can open the folder we want to copy to, and simply drag and drop all the files from the drop stack to that folder.  All the files will be copied in a single process.

If you want to copy the set of files to multiple folders, hold down the CONTROL key while dragging and dropping the file(s).  This ensures that the files in the drop stack are not removed once the copy process has completed.  This makes it easy to copy the same set of files (from different folders) to multiple locations.

Note that you can drag files to the drop stack from Windows Explorer, and also copy files from the drop stack to Windows Explorer.

Download a 14-day trial of Easy Explorer now and experience an easier way of working with your folders and files.