Tag Archives: DICOM Search

Indexing DICOM images on your desktop

You have a collection of DICOM images from various sources, and you want to be able to search for images matching specific values in their tags.  And you don’t want to have to install an entire Apache/Cloudera Hadoop server.

Bottom line, you just want an easy way to search your collection of DICOM images.

If that’s the case, then give DICOM Search a try.  It is a Windows application (runs on Linux too via Wine). that extracts the value of each and every tag from your images and stores them into a relational database.  You then use regular SQL syntax to run your searches.

There is also a simplified syntax for those of us that don’t know SQL, where you can run searches like this easily:

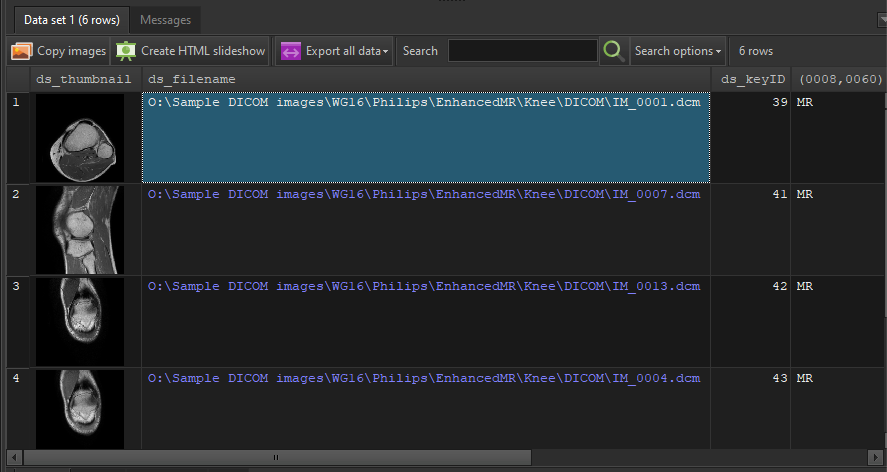
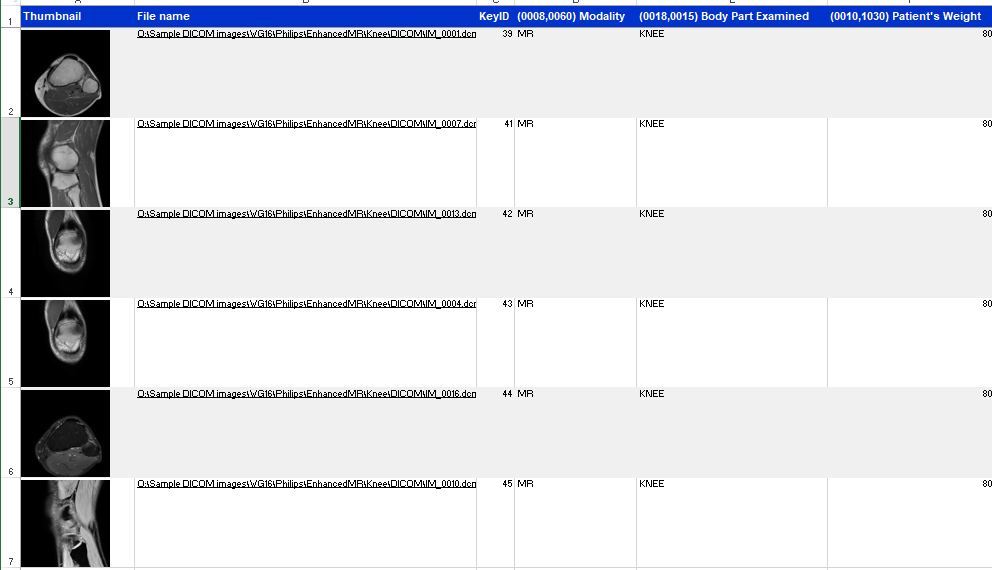
It’s that simple.  Your results are displayed in a table e.g.

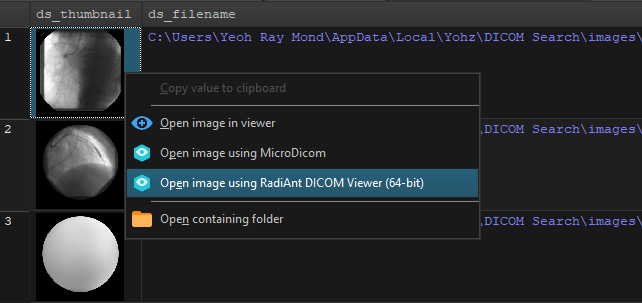
where you can then open the image using your favorite DICOM viewer

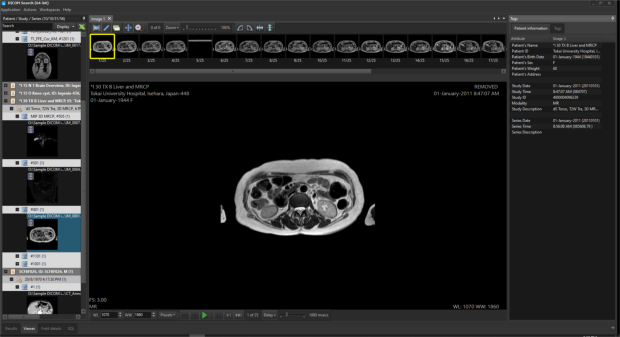
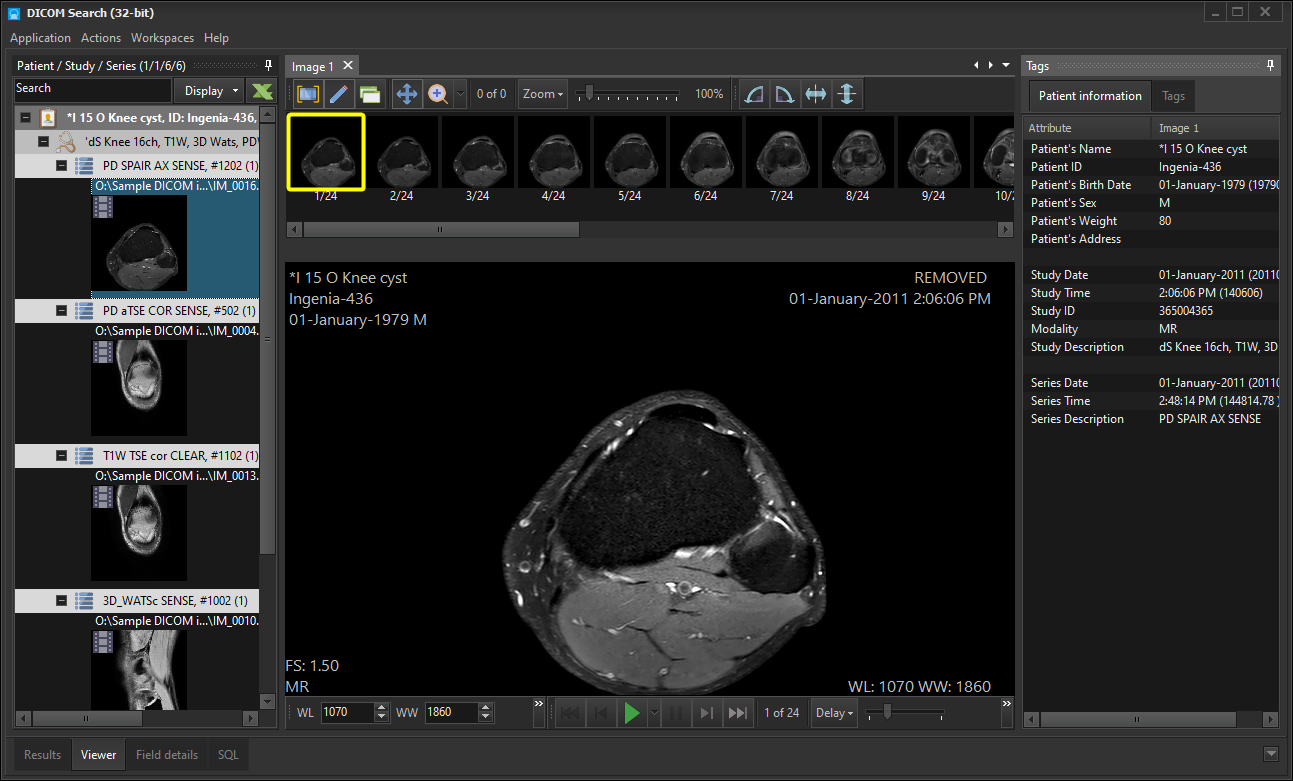
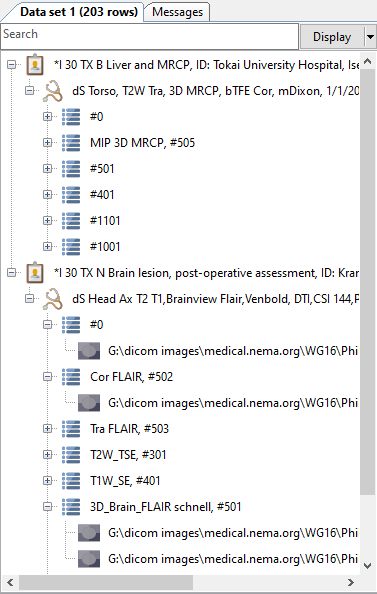
or use the internal viewer which displays your search results in the familiar patient/study/series hierarchy.

Imagine the possibilities when you can now search for any image in your collection using the values in the tags, on your desktop computer.

Learn more about the product on our website, or watch the introductory video here.

Download a 14-day trial of DICOM Search now and start searching your DICOM images efficiently and effortlessly to make new discoveries.

Creating an index of the DICOM image tags

A DICOM image can contain anywhere from a hundred to a thousand tags, sometimes even tens of thousands of tags.

It’s usually not an issue to search for an image matching a specific tag value on the equipment used to capture the images using the manufacturer’s software.  However, if you had a collection of images taken from different equipment, you then had to organize your images somehow in order to keep track of each image’s attributes.

Not any more.  DICOM Search is a Windows application that stores the values of each and every tag of a DICOM image into a database.  You can then search that database for images that match one or more tag values easily using SQL queries (or a simplified SQL syntax for beginners).

Basically, you have the power of a relational database engine to search your DICOM images based on their tag values.

Let’s take a closer look at DICOM Search.

Storing the image tag values

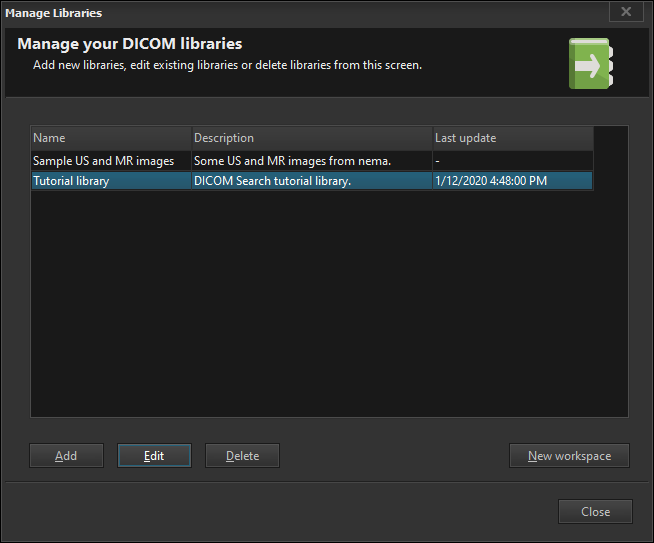
Your DICOM images are organized into libraries.  Each library can contain images from different sources, or you could just lump all images into a single library.

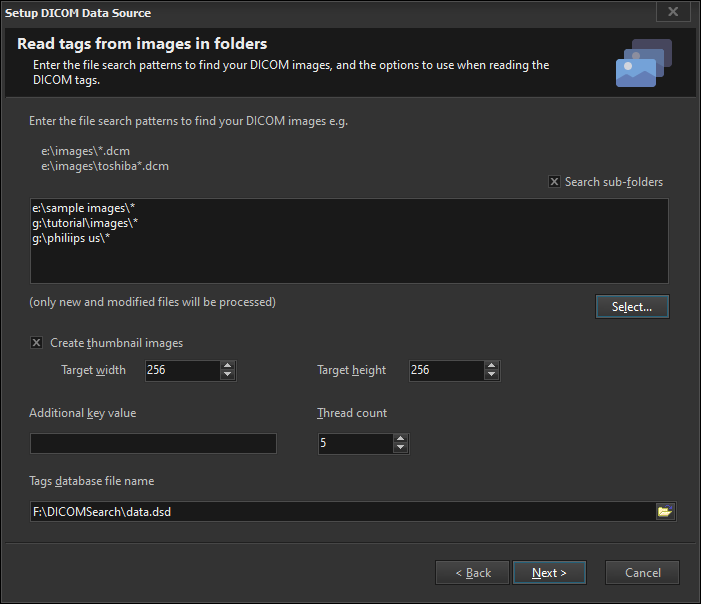
You can populate each library with images stored on your folders

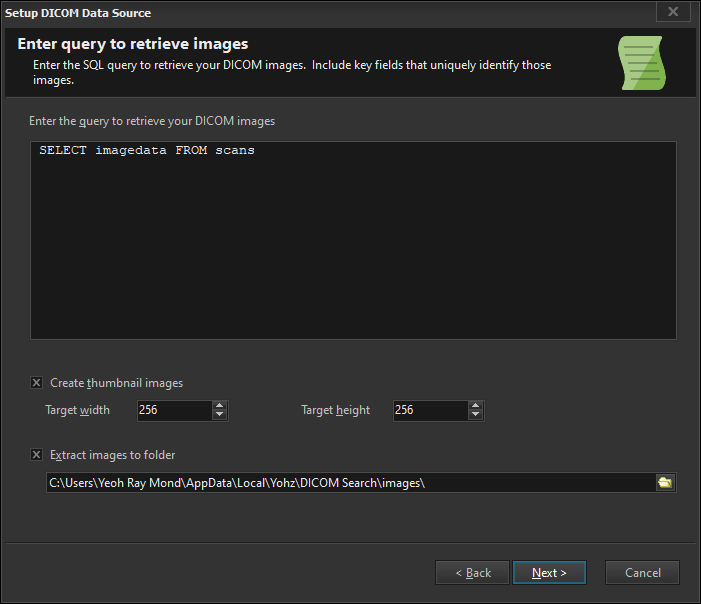
or you can connect to a SQL database to retrieve the images to populate your library.

Once your images have been retrieved from your folders or from a database, each tag is then processed and stored in a database table.

Searching for images

Say you want to search for MRI images of the knee where the patient weight is 75 or more.  This is how you would enter the search criteria in DICOM Search.

And this is how DICOM Search displays the search results.

Plain and simple.  Using tags, you can use plain words to refer to a tag, instead of the usual group and element numbers.  Of course, you can use the group/element combination if you so prefer e.g. to retrieve the same results above, you would enter:

Given that you have the power of a relational database engine under the hood, you can write some pretty advanced queries to retrieve your images.

Working with the search results

Once you have the images from your search results, here’s what you can do with them in DICOM Search:

  • copy the images to another folder, making it easier to work with just those images of interest
  • create a HTML slideshow containing those images
  • export the images and all the tag values in the search results into an Excel spreadsheet
  • open the images using your preferred DICOM viewer for further analysis
  • open the images using the internal viewer for further analysis

The above just scratches the surface on what DICOM Search can do.  Learn more about the product on our website, or watch the introductory video here.

Download a 14-day trial of DICOM Search now and start searching your DICOM images efficiently and effortlessly to make new discoveries.

Converting DICOM images to png, tif, jpeg

In DICOM Search 1.3, you can now convert the DICOM images in your search results to other formats, like png, tif, jpeg, bmp, and gif.

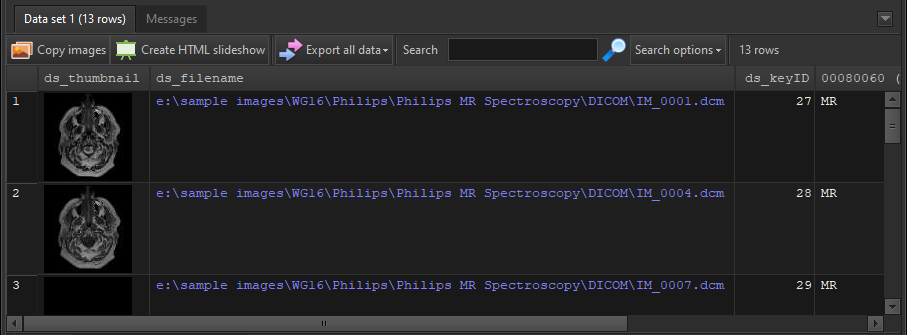
You need to first run a query to retrieve some images.  Let’s search for all MR images for the brain, from the sample images used by our tutorial.

This returns 13 images.

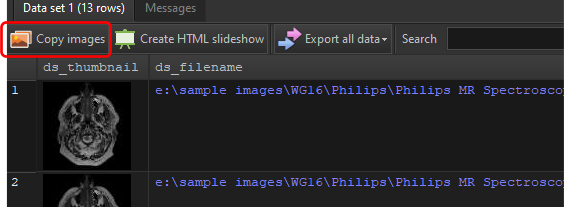
Let’s convert those 13 images to another format.  Click on the Copy images button.

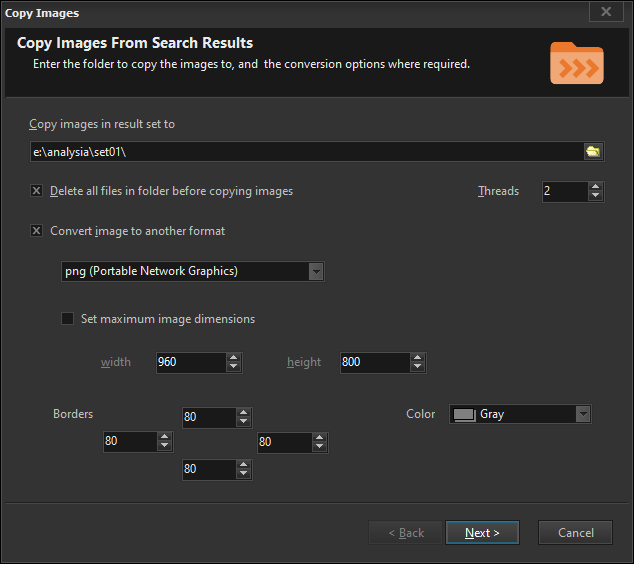
This brings up the Copy Images window.

Enter the folder to copy/export the images to.  If you don’t select the Convert image to another format, then the files will just be copied from the source folder to the selected folder.

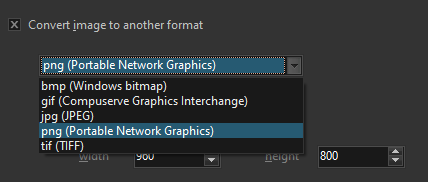
If you do select the Convert image to another format option, you can select the format to convert to.

Note that only the TIFF format supports multi-frame images.

In this example, we will also add a gray border around our image, so that the tag values from our information profile do not overlap with our images.

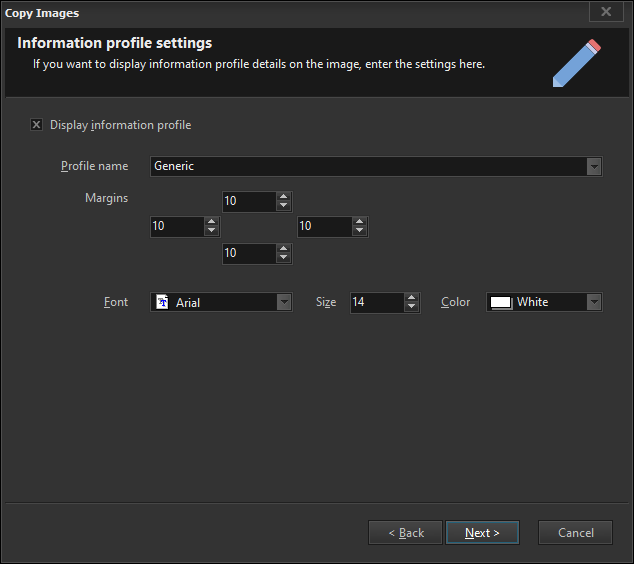
When converting our DICOM images, we also have the option of using our information profile to embed DICOM tag values into the converted images.

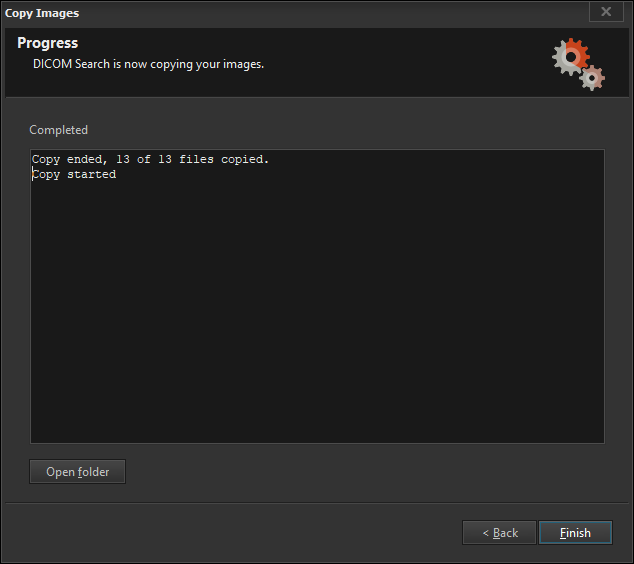
Let’s select the Generic information profile, and click Next to start the export/conversion process.

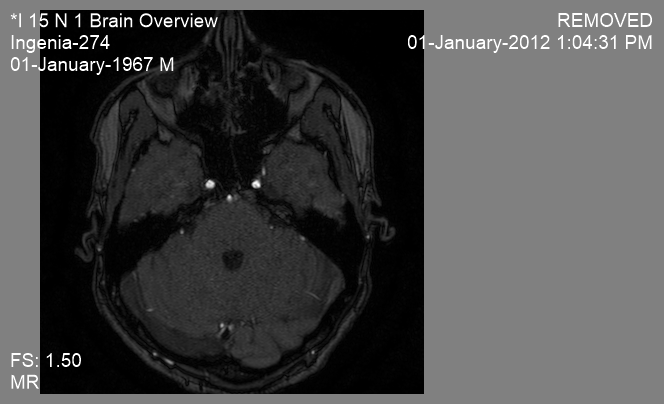
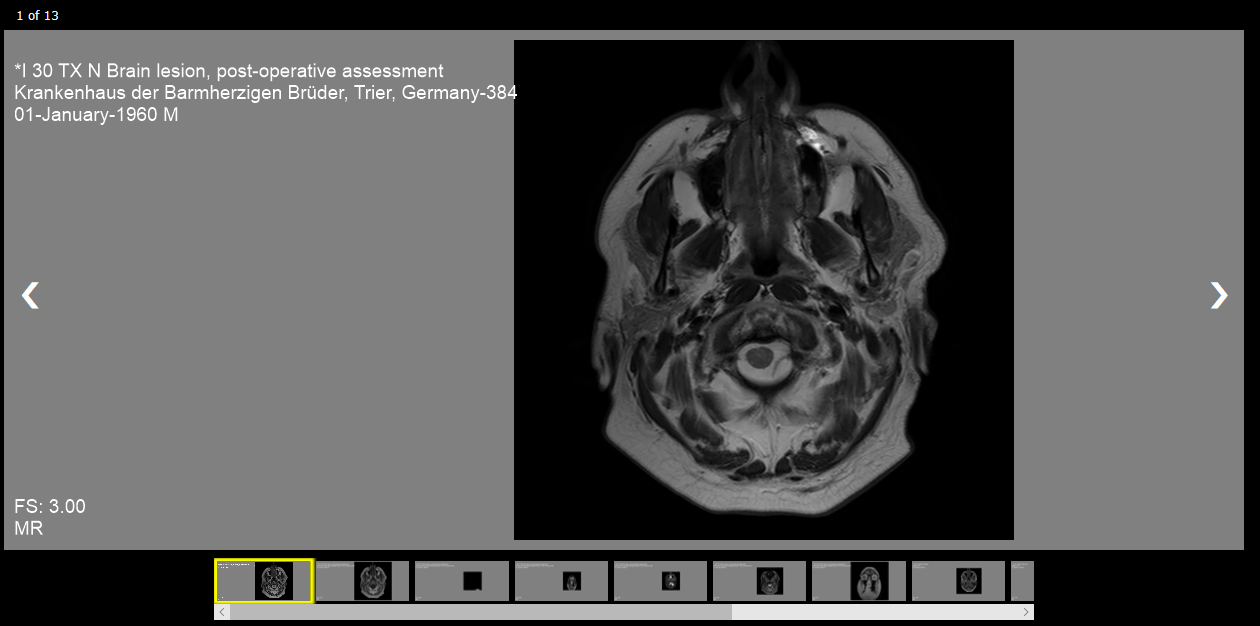
This is one of the exported images.

As you can see, we added a gray border around our image, but perhaps we could have made the left border larger, as the tag value covers part of the image.  Or we could have made the information profile font smaller.  Or we could adjust our information profile so that the values are only displayed on the right sides.  There are so many options open to us, so do experiment to see what works best for you.

Creating a slideshow using DICOM images

In DICOM Search 1.3, we added the option to create a HTML slideshow from the images in your search results.  Click here to see a sample slideshow.

You need to first run a query to retrieve some images.  Let’s search for all MR images for the brain, from the sample images used by our tutorial.

This returns 13 images.

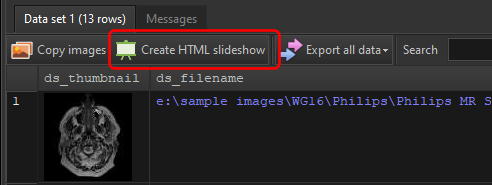
Let’s create a slideshow containing these 13 images.  Click on the Create HTML slideshow button.

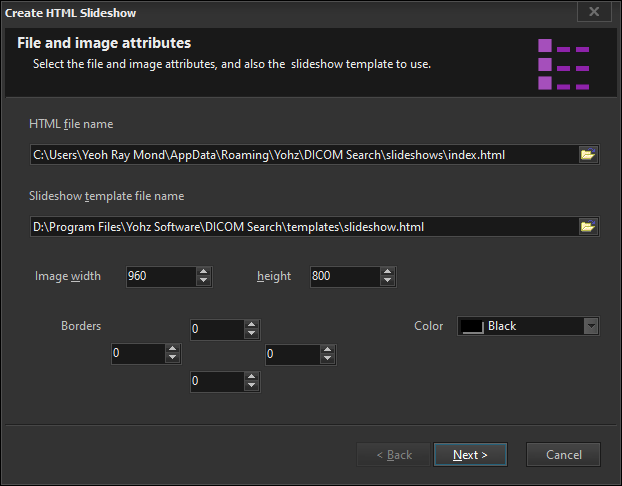
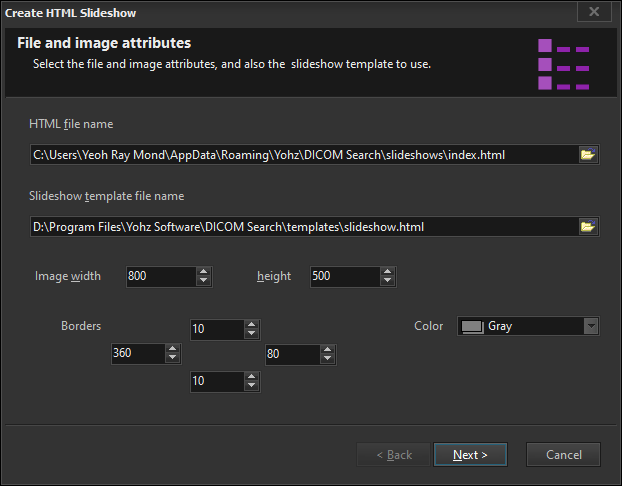
This brings up the Create HTML Slideshow options.

The HTML file name is the name of the html file you want to create.  The Slideshow template file name is the slideshow template to use.  DICOM Search ships with 2 templates, which you can easily customize to your needs.

You can also resize the images to fit a specific width and height in pixels.  Additionally, you can also add a colored border around the image.  This is useful when you want to display information profiles in the images.

For this example, we will create a gray border of 360 pixels on the left, 80 pixels on the right, and 10 pixels for top and bottom.

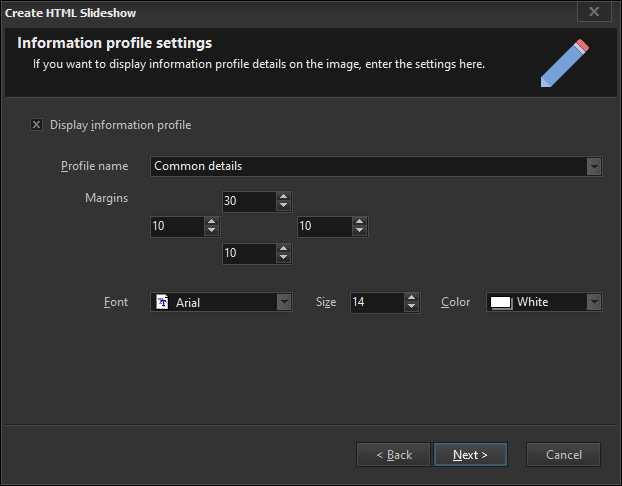
On the next page, you can choose to embed DICOM tag values in your images using information profiles.  You can also set various attributes like margins and fonts.  Here, we’ll just select the Common details information profile.

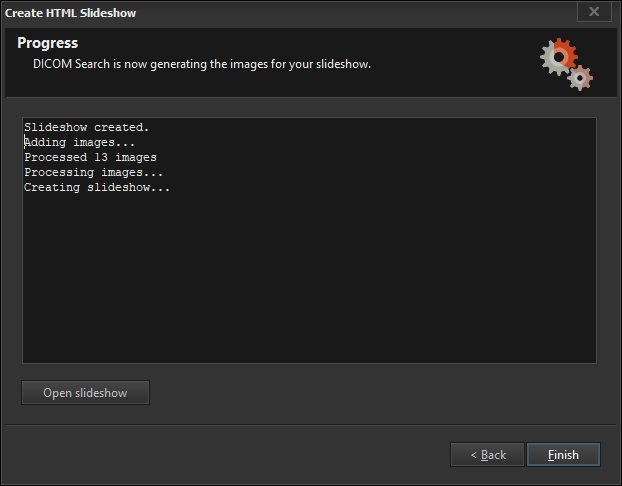
DICOM Search then creates your slideshow.  When completed, click on the Open slideshow button.

Windows should then open the slideshow file in your browser.

Note the following:

  • you can customize the slideshow templates to change the appearance
  • the DICOM tag values from the selected information profile are embedded in the image
  • the margins are used so that the tag values do not cover the image
  • you can easily create information profiles that display a lot more information to be embedded in the slideshow images

Connecting to SQL Server via ODBC using SQL authentication

We recently had a user who had his SQL Server hosted in a data center, and needed to extract files from his database.  He could connect to the instance remotely, but it took too long to extract the files this way.  He tried connecting to the database via another computer in the data center, but received the ‘TCP Provider: An existing connection was forcibly closed by the remote host.‘ error.

This suggests a network configuration setting issue.  Instead of getting the data center to change the server settings, we instead set up an ODBC connection and used that connection in SQL Blob Export.

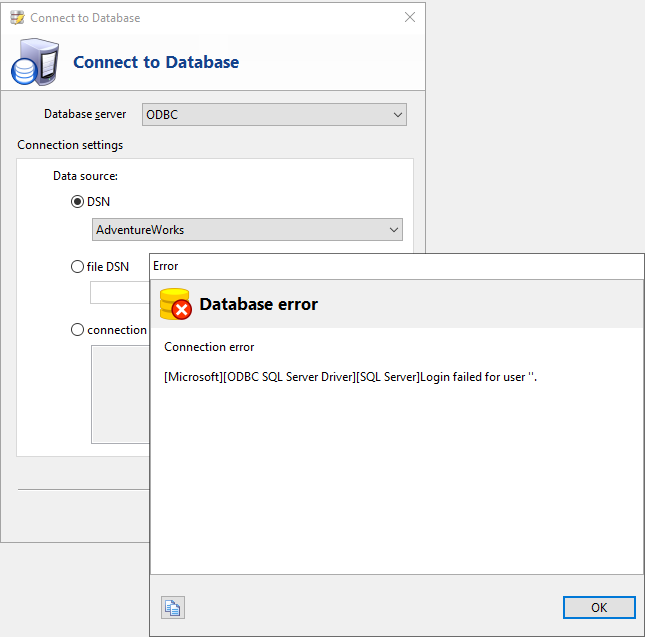
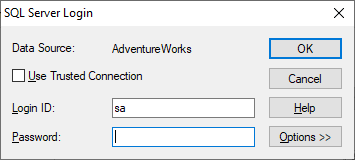
Using Windows authentication to connect to the instance via ODBC was easy enough.  However, if using SQL Server authentication, the password is not stored in the ODBC settings, and the connection would still fail.

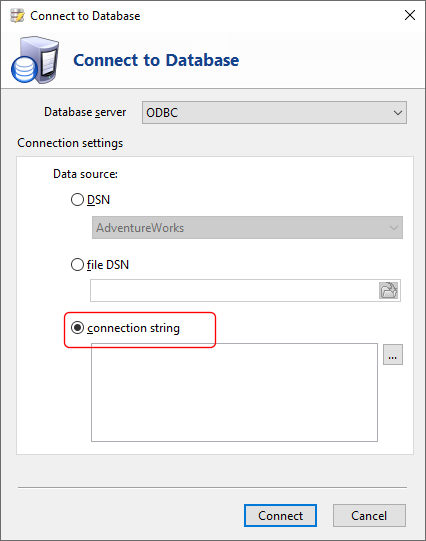
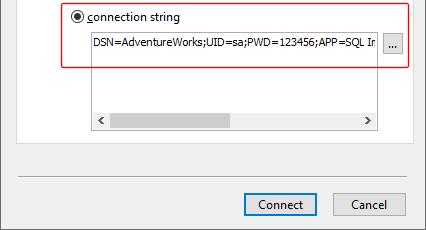
In order to connect to the SQL Server instance via ODBC using SQL Server authentication, choose the Connection string option instead.

Click on the Browse button

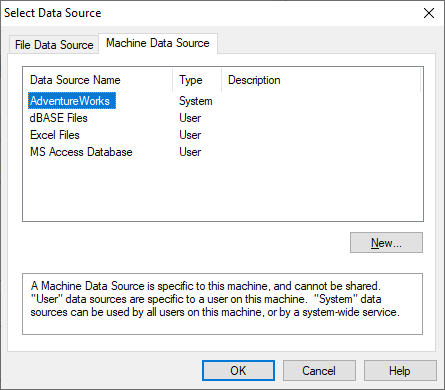
and select the ODBC connection to your SQL Server database.

The SQL Server ODBC connection manager will then prompt you to enter the password.

Enter the password in the provided area and click OK.  The ODBC connection string is then filled out, together with your password.

Click on the Connect button.  SQL Blob Export should now successfully connect to your SQL Server database using SQL Server authentication.

The same steps apply to our other database products that support SQL Server and ODBC connections.

If you require further assistance, you can post your questions in our support forum.

DICOM Search on Linux

DICOM Search is a Windows application and cannot run natively on Linux or MacOS.  Recently, we had a go at installing and running DICOM Search on Ubuntu 20.04.  We had it installed and running, but there were some issues with using the dark theme, some text were getting cropped, and the overall look was ugly (to put it mildly).

We have since resolved this, and you can now install and run DICOM Search on Ubuntu 20.04.  If you do encounter any issues or GUI abnormalities, please do drop us a line at support @yohz.com.

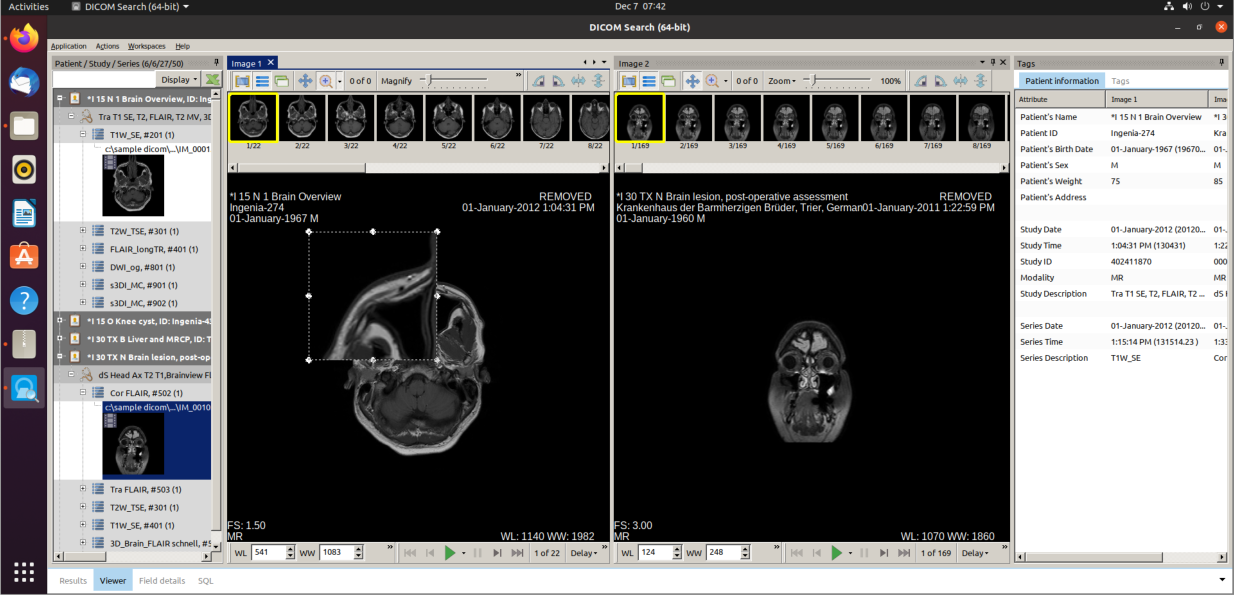
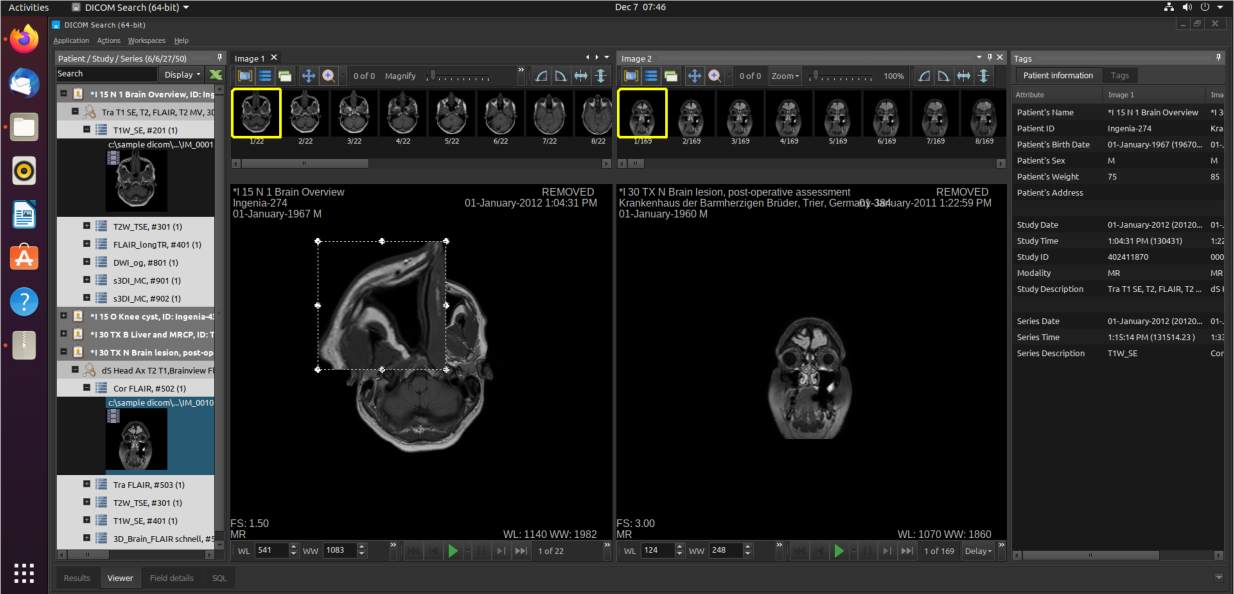
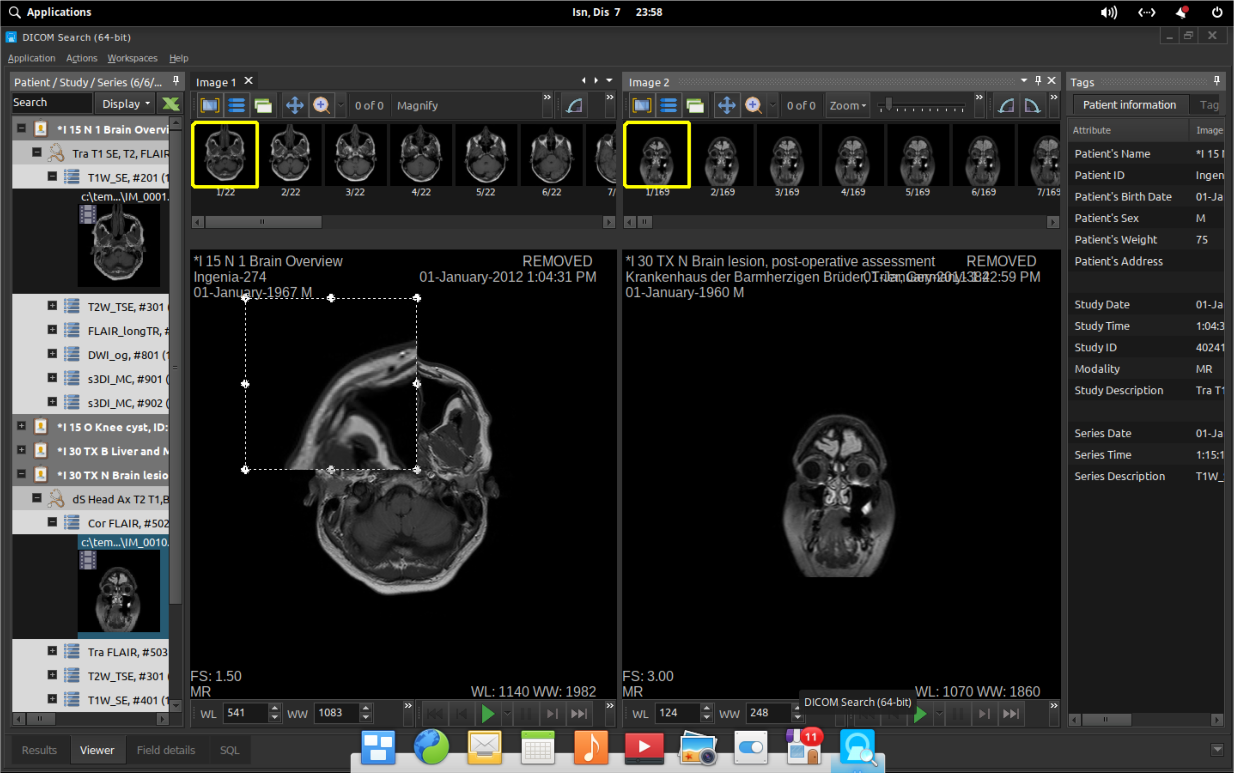
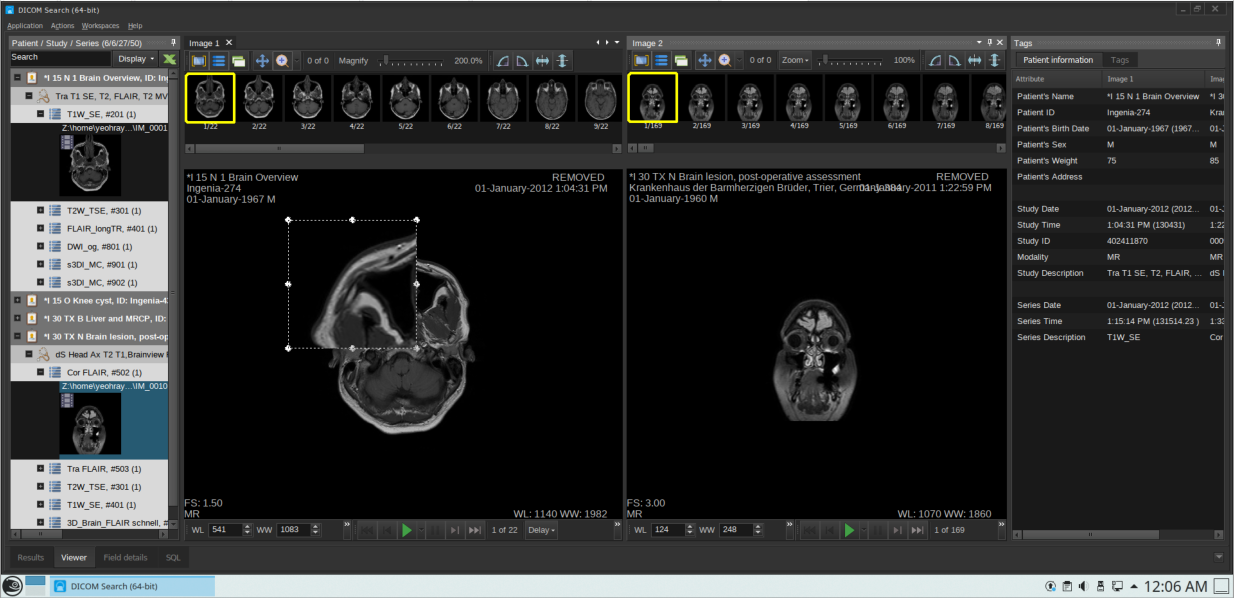
Here’s DICOM Search running on Ubuntu 20.04 via Wine:

(windows theme)

(dark theme)

We also tested DICOM Search on Elementary OS 5.1 and OpenSUSE 15.2.

(Elementary OS 5.1, dark theme)

(OpenSUSE 15.2, KDE Plasma desktop, dark theme)

If you do encounter any strange behavior when running DICOM Search on your Linux distribution, please do let us know at support@yohz.com.  Thank you.

Now, if only we had a Mac to test on…

Searching for numbers in DICOM text tags

Some DICOM tags store a numerical value along with some textual information.   This makes it difficult to search for a specific value using mathematical operators.

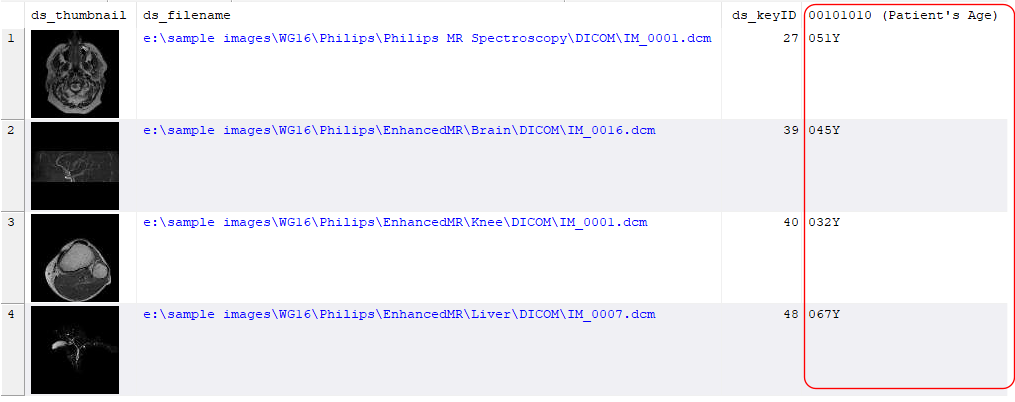
For e.g. the age tag [00101010] in my DICOM images store the patient age together with a prefix (0) and a suffix (Y) i.e.

If we want to search for images where the patient age is between 50 and 60, we would need to write our search query like this:

age IN (‘050Y’, ‘051Y’, ‘052Y’, ‘053Y’, ‘054Y’, ‘055Y’, ‘056Y’, ‘057Y’, ‘058Y’, ‘059Y’, ‘060Y’)

which is very tedious and error-prone.  In DICOM Search 1.2, we added the EXTRACTNUMBER and EXTRACTNUMBERDEF functions to deal with this issue.

EXTRACTNUMBER will extract the first sequence of digits from the tag value and return the number.  If there is no valid digits, the value 0 is returned.  We can then rewrite our search query this way:

EXTRACTNUMBER(age) >= 50 AND EXTRACTNUMBER(age) <= 60

or

EXTRACTNUMBER(age) > 49 AND EXTRACTNUMBER(age) < 61

or

EXTRACTNUMBER(age) IN (50, 51, 52, 53, 54, 55, 56, 57, 58, 59, 60)

The EXTRACTNUMBERDEF function accepts a 2nd parameter as the default value to use when no digits exist in the value.  If our search query was written this way:

EXTRACTNUMBERDEF(age, -1) = -1

then any images where the age tag value does not contain numbers will return the value -1, and we can then easily see which of our images does not contain a valid age value.

DICOM Search – improved DICOM view (preview)

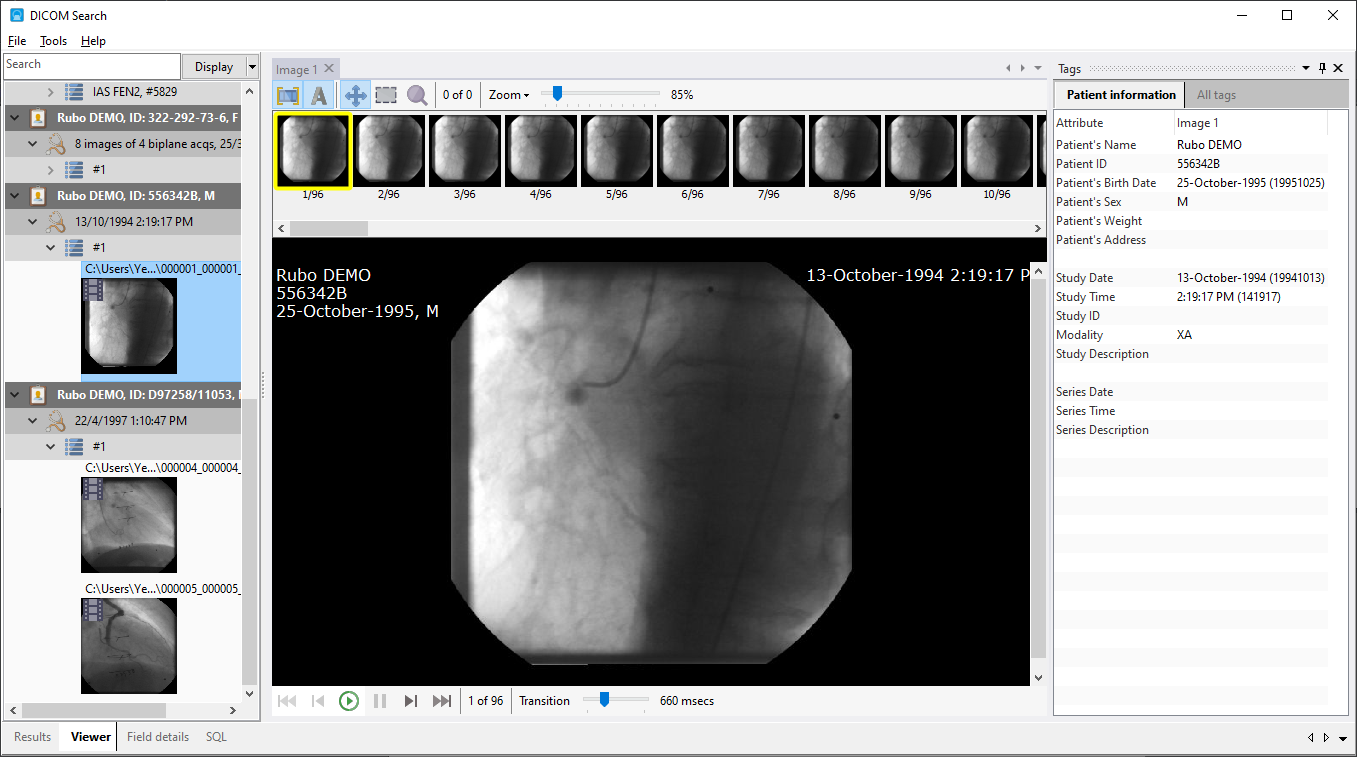
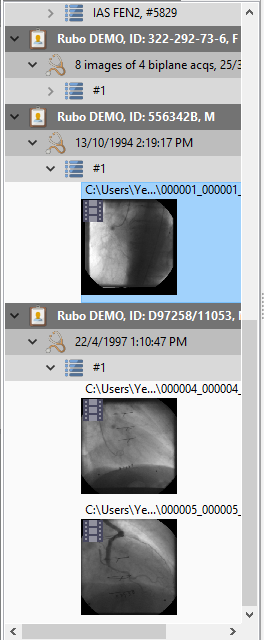
In the latest iteration of DICOM Search, we can now display your search results in a patient/study/series listing this way:

  • thumbnails are now displayed in the patient/study/series listing

This allows you to easily view the image without having to open it in the main viewing area.

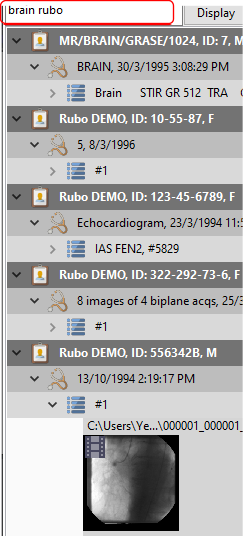
  • you can filter on multiple values

In the above example, DICOM Search will display the images belonging to any patient/study/series containing the word brain OR rubo.

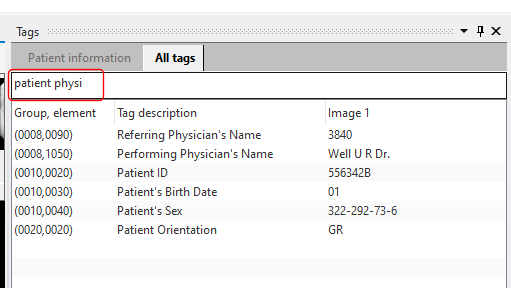
  • similarly, you can also filter on multiple values on the tag values

In the above example, only tags containing the word patient or physi are displayed.

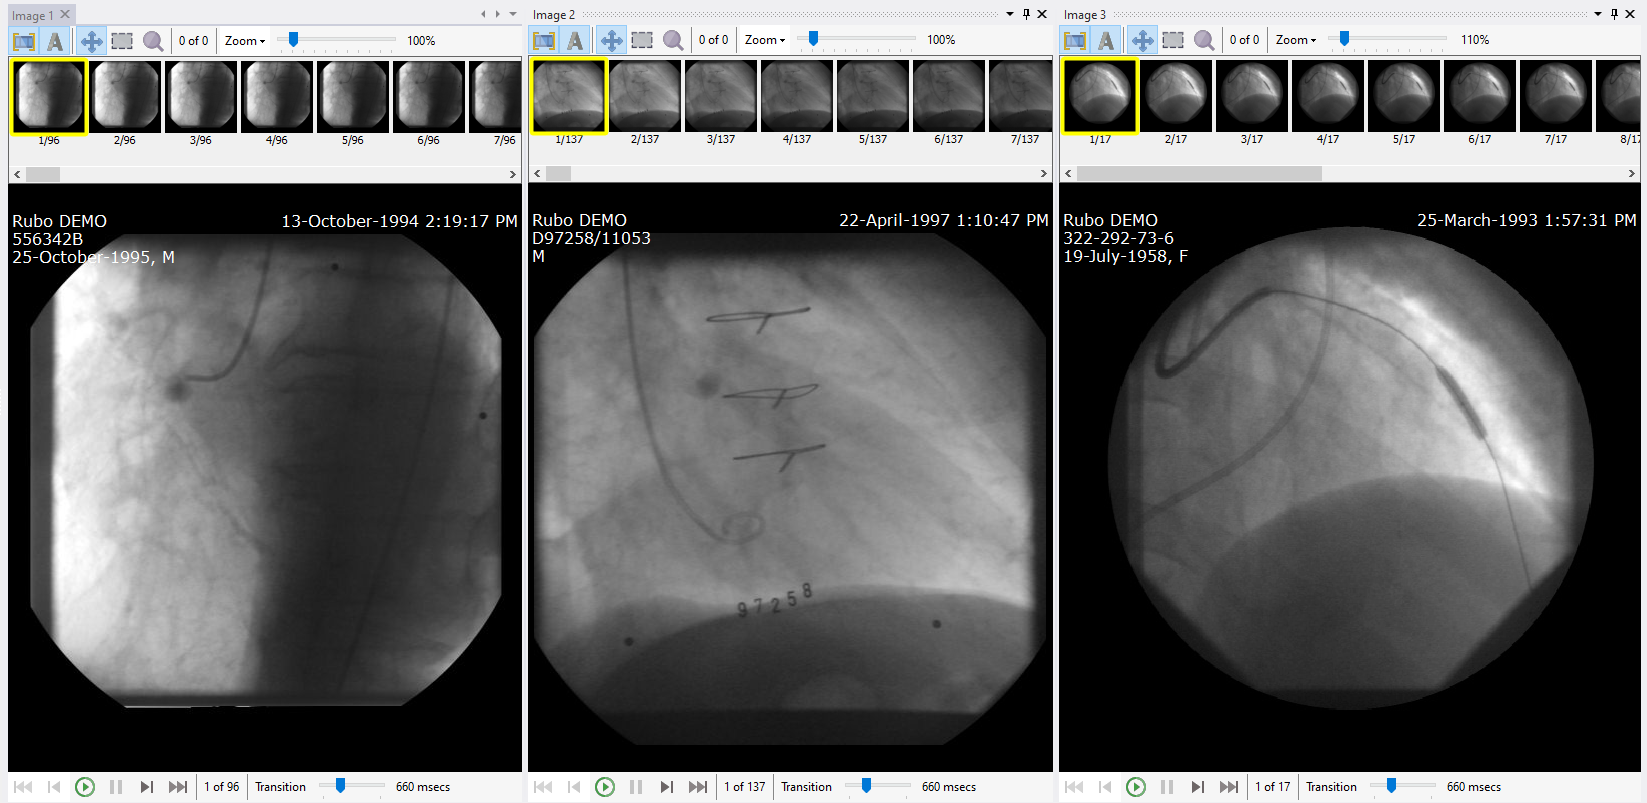
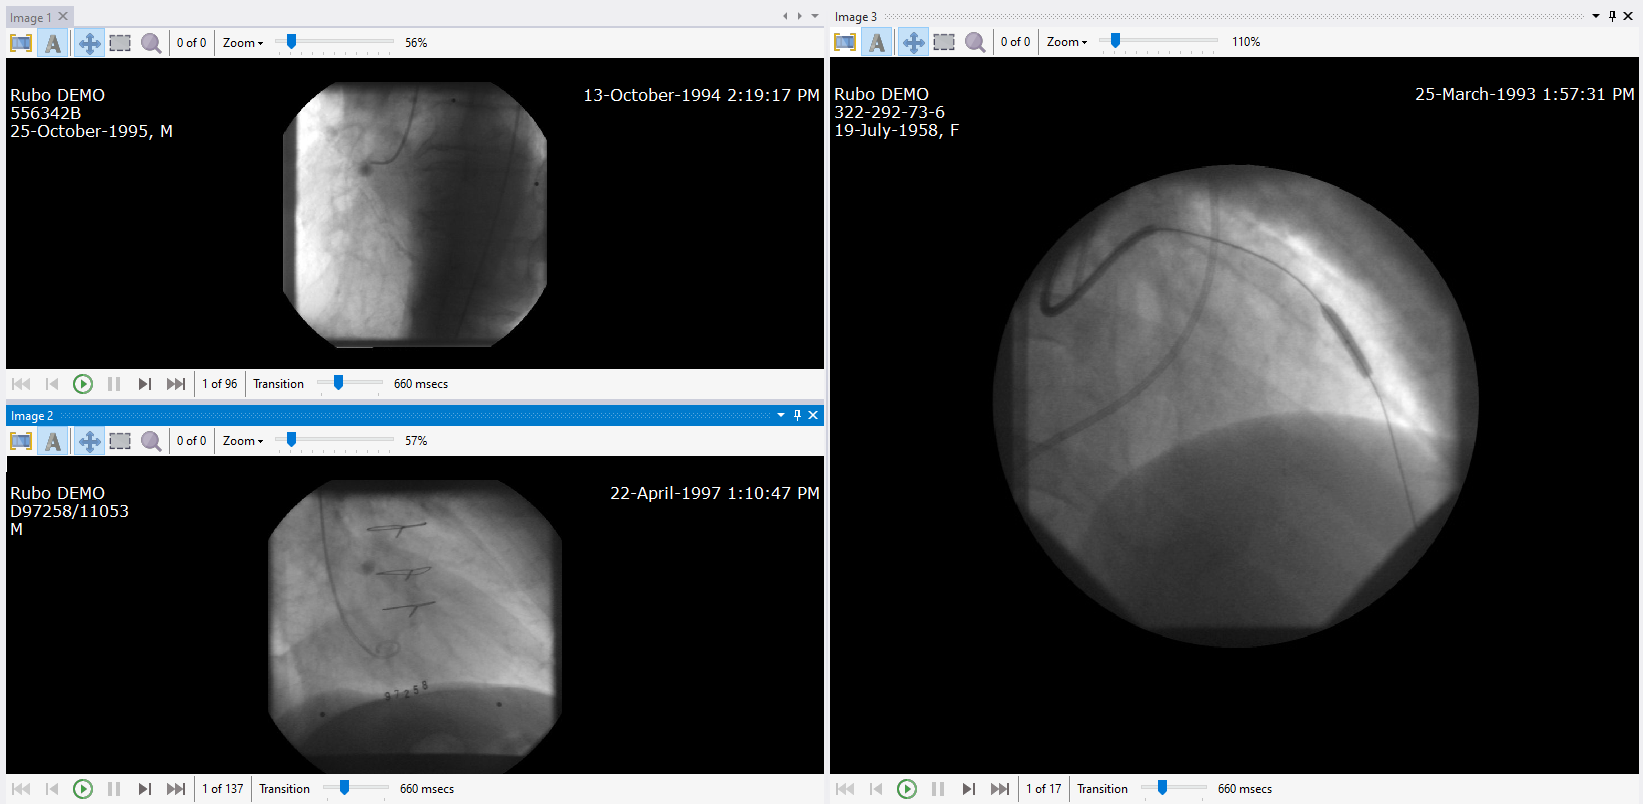
You can now also display multiple images in the DICOM viewer.  You can adjust the position and size of each image panel to your requirements.  For e.g. if you are displaying 3 images, this could be one layout:

or you could lay them out this way:

You can open as many image panels as you require, limited primarily by the size of your display.

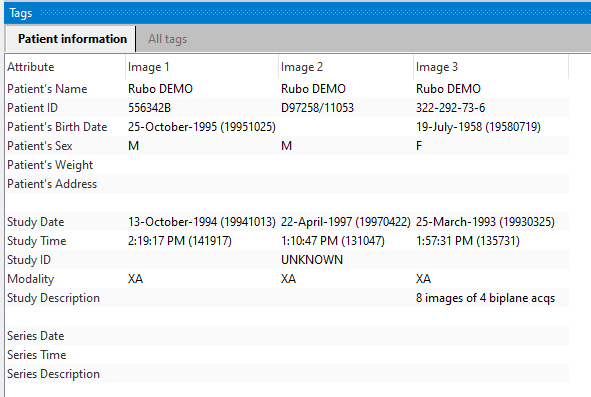
When you open multiple image panels, the DICOM details are also displayed for each image.  In the above example. the patient information would be displayed this way:

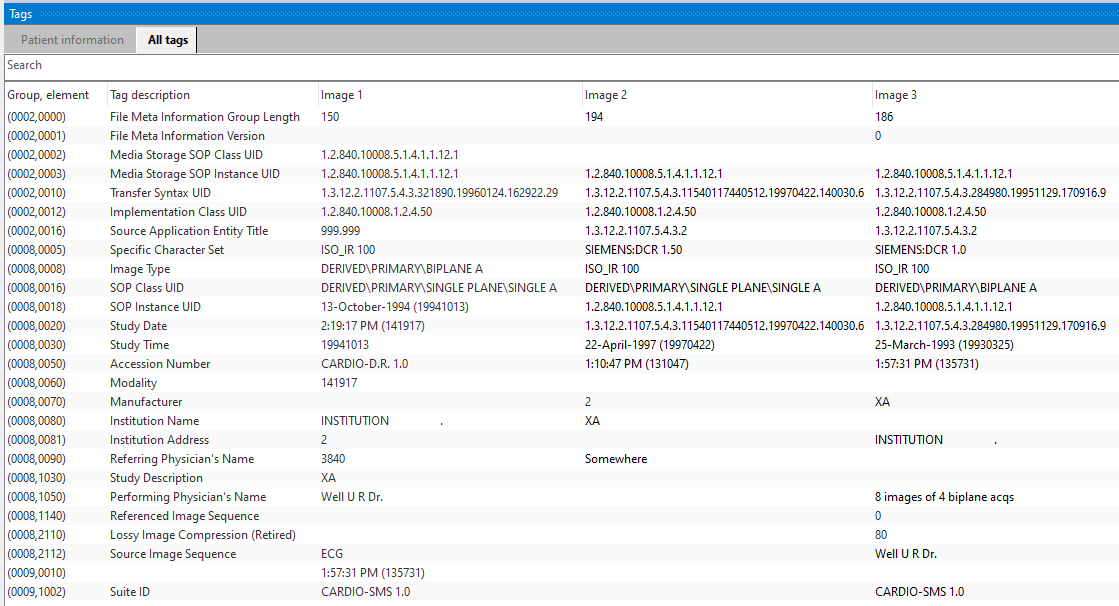
Similarly, the DICOM tag values found in each of the image are displayed this way:

If you apply a search filter, then only the tags matching the filter are displayed for all the images.

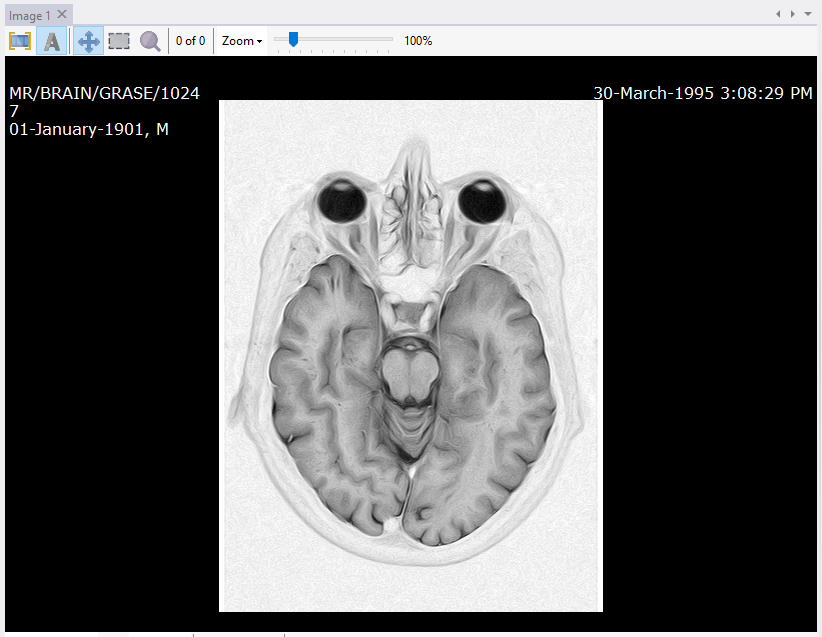
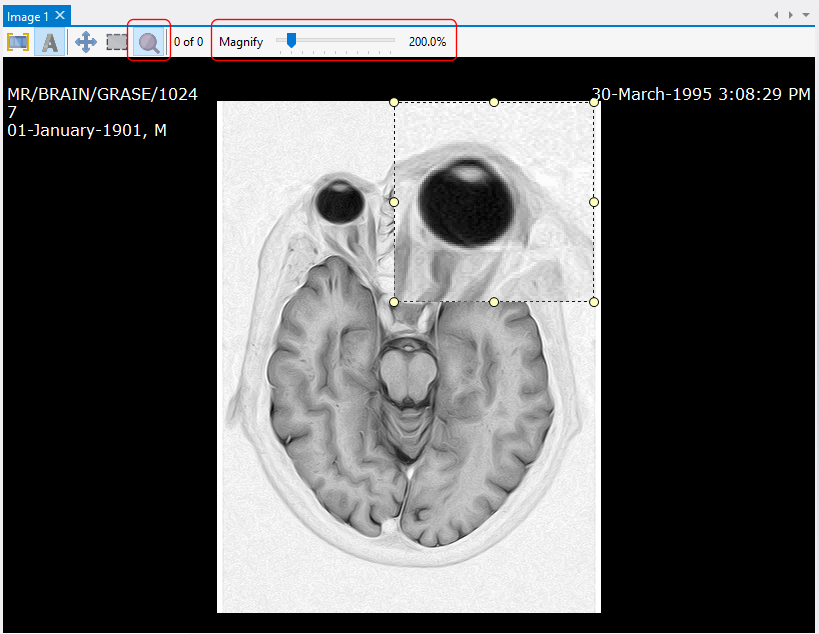
In the image viewer, there is now a magnification layer option.  Say you opened the following image:

You now have the option to magnify a part of the image, and also choose the magnification level and magnification area.

We hope to release DICOM Search early next month.  If you would like to have early access to the product and give it a try, please drop us a line at support@yohz.com.  We welcome any feedback you may have.

DICOM Search walk-through (preview)

We’ll do a walk-through on how to index your DICOM files and how to retrieve and display the images you need.

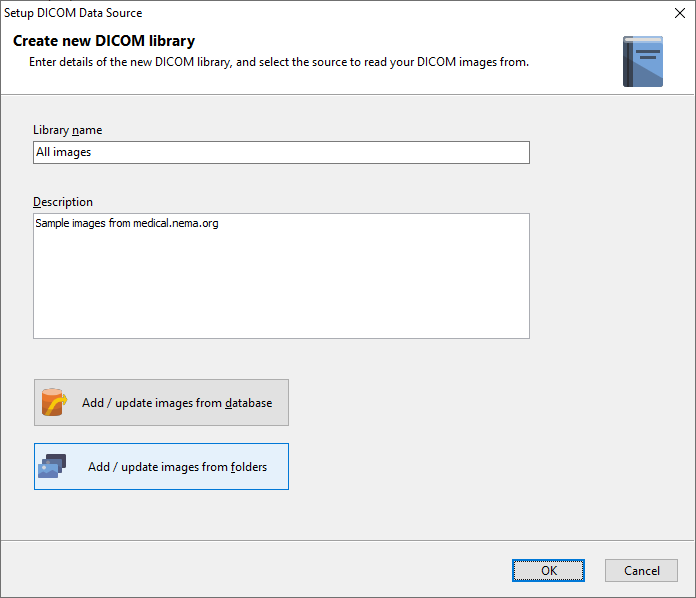
We start by first creating a library in DICOM Search, and selecting the Add/update images from folders option.

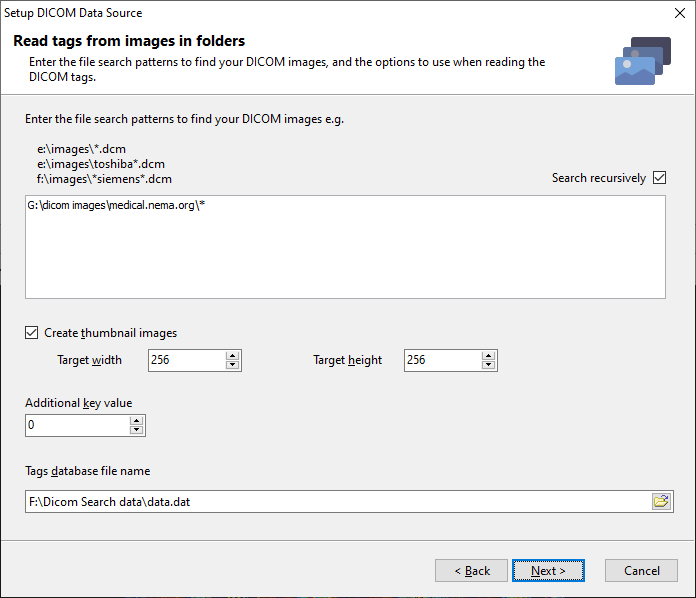
We then enter the file search pattern which will be used to locate our DICOM files.  Here, we’ll create thumbnails of our files, and enter the database file name to store the tag values and thumbnails in.

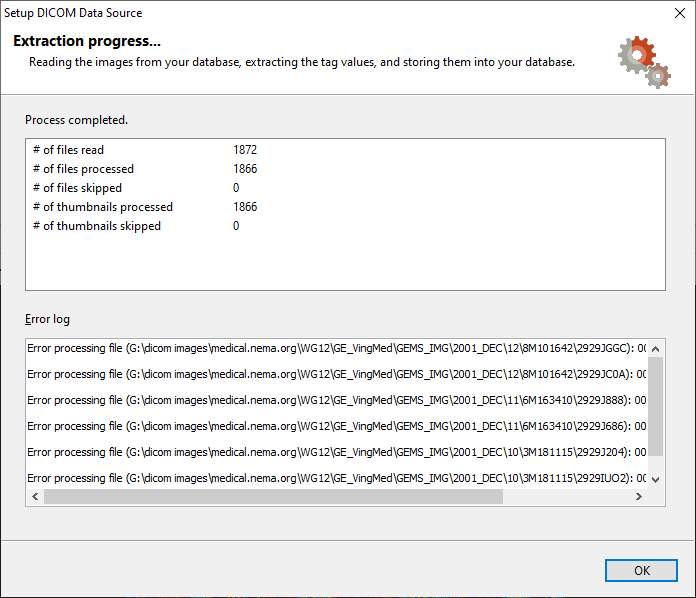
DICOM Search will then start processing the files and report the status as it goes along.

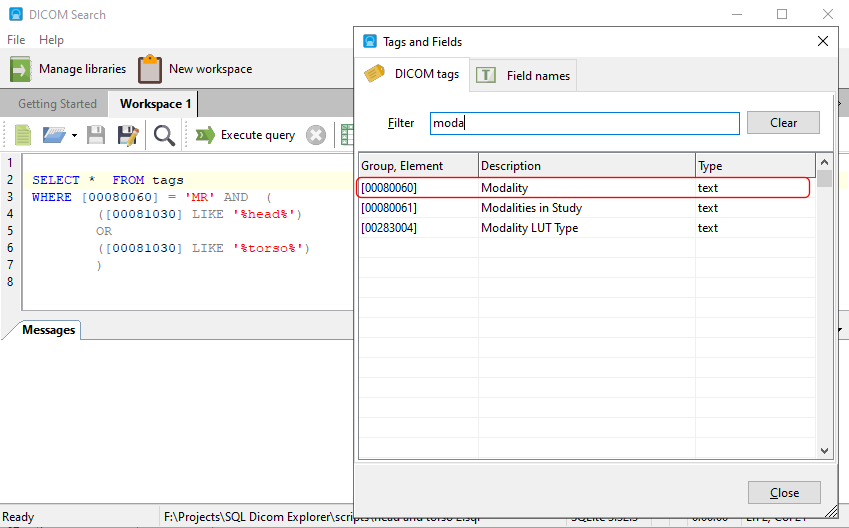
Once done, we can now run queries on the database.  In this example, we want to retrieve all MRI images where the study description contains the word head or torso.

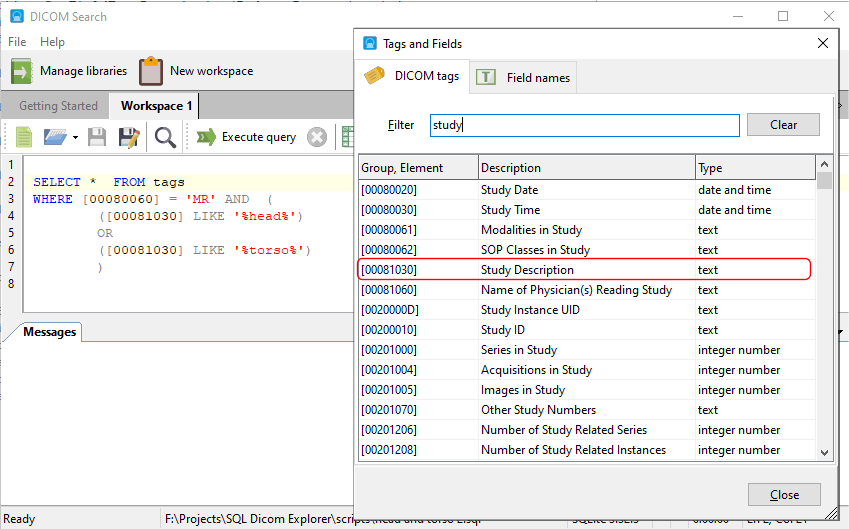
At this point, you must be wondering how are we to remember the group and element values for each of the tags we want to search on.  You don’t have to remember those values.  Pressing F2 will bring up a tags window where you can search for any tag values by description.

E.g. if we search for modal, we can see all the tag values for modality.

Likewise, if we search for study, we can see the tags containing the word study.

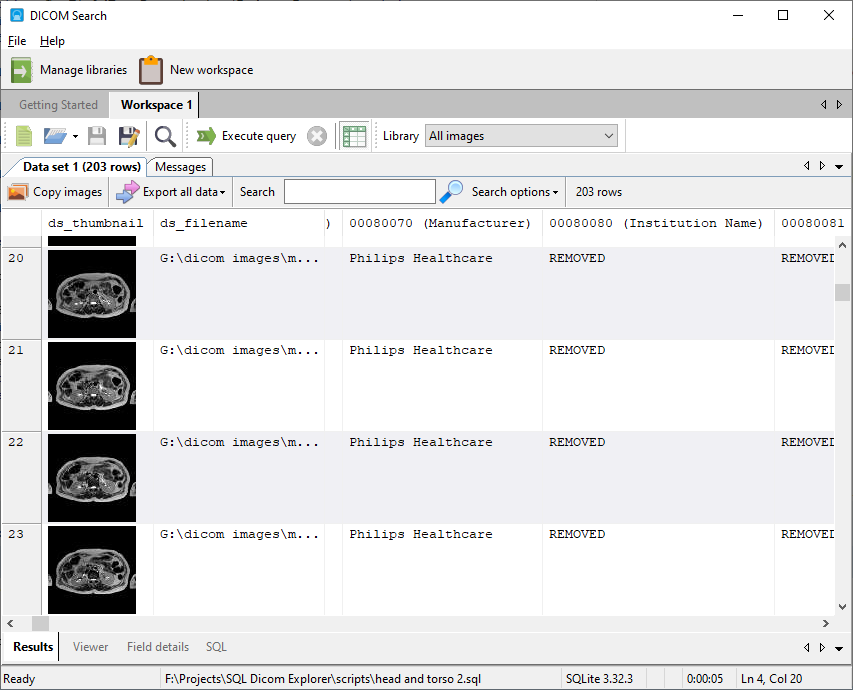
When we run our query, all images matching our search criteria are returned.

Depending on our query, we may choose to return only the tag values we are interested in seeing, or in our example. all of the tag values because we entered

SELECT * …

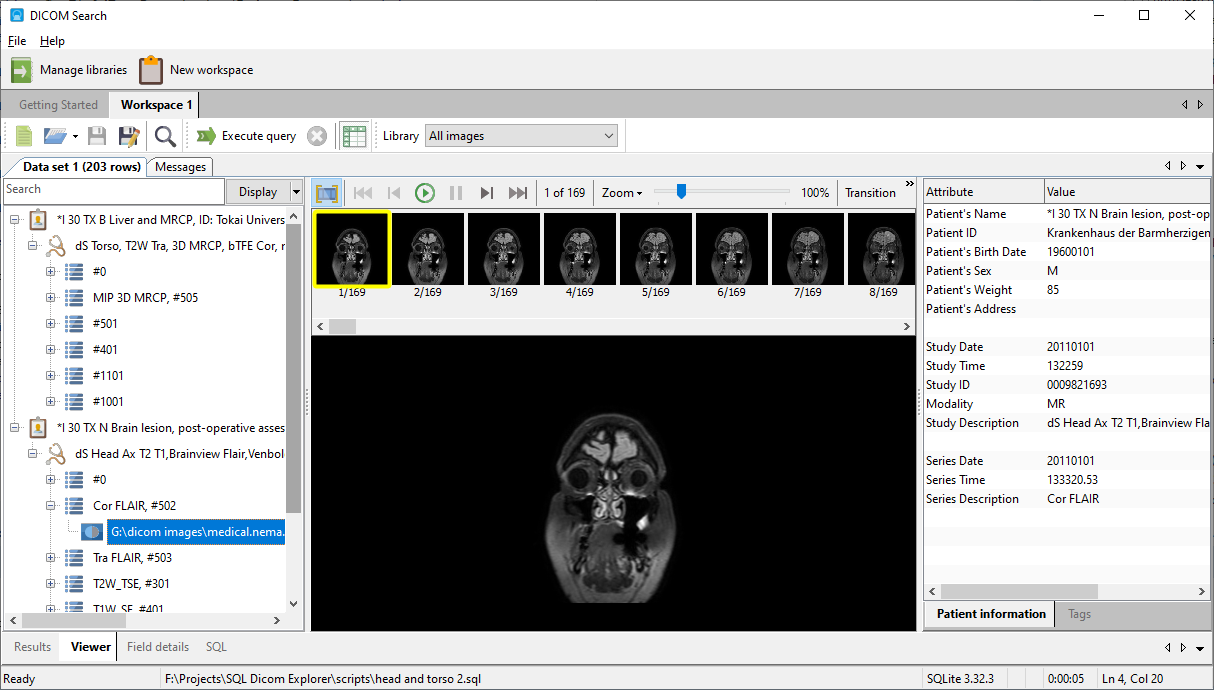
DICOM Search offers an alternative view to display the images returned by your query.  This is the DICOM results viewer.

On the left, the query results are grouped by patient, study, series, and and related images.

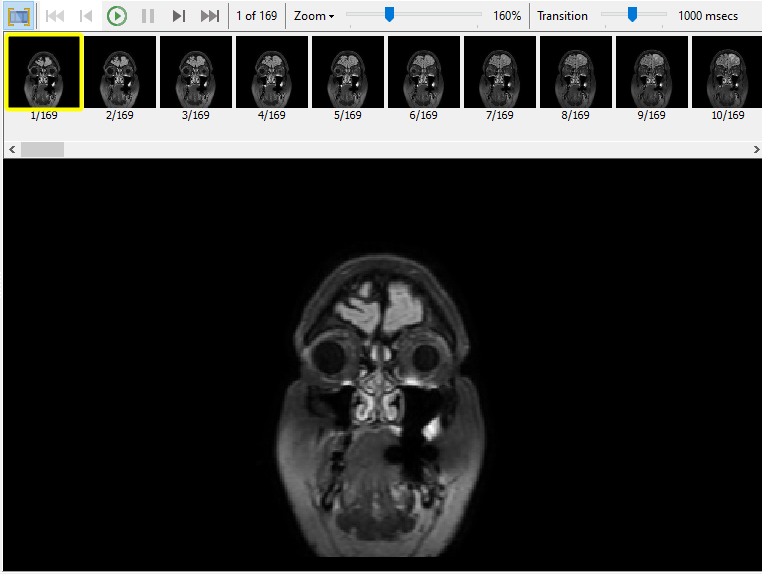
You can display any of the image file in the main area simply by selecting it here.  DICOM Search will display the frames of the images at the top, and the selected frame in the main area.  You can play the sequence of images, display a single frame, view the transition from one frame to another and more in this area.

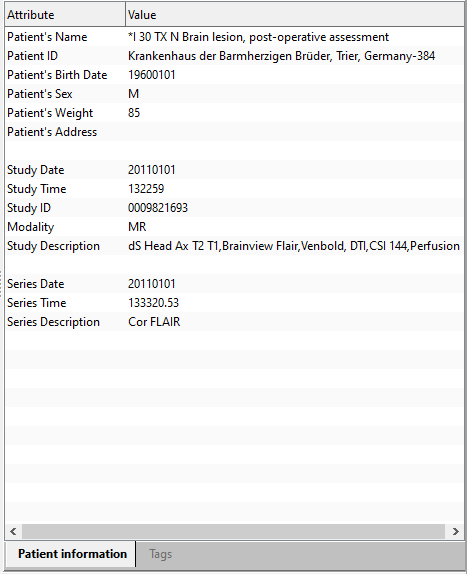
On the right, the values of the DiCOM tags are listed.  There is a patient specific tab that displays the patient data together with some image context tags

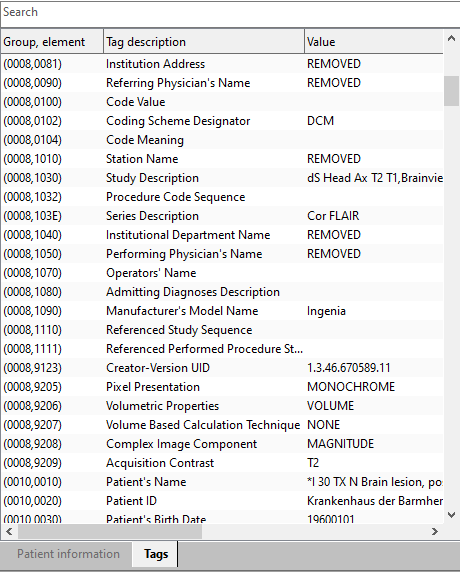
and a Tags tab that displays all the tag values found in the image.

If you have any suggestions on how we can improve on this new view, please do drop us a line at support@yohz.com.  Thank you.

See also:

DICOM Search – querying the database (preview 2)

Once DICOM Search has indexed the DICOM tags in your images, you can run queries against the tags table.  Selecting everything from the tags table, while possible, isn’t very useful and is very slow.
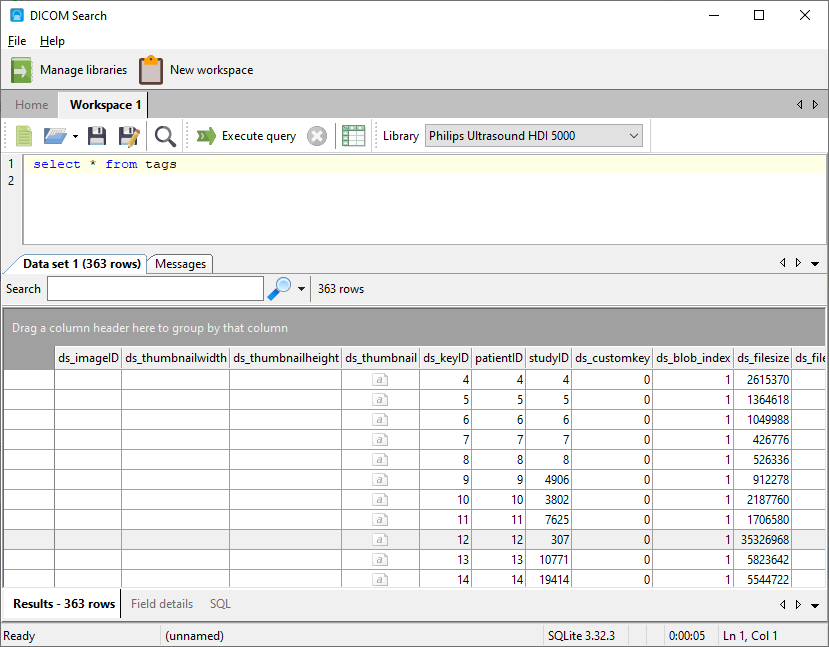
The reason is because there are over 2800 fields, and DICOM Search will struggle to maintain and display that many columns.  Thus, it is recommended that you select only the fields you are interested in.

You can quickly see which fields are available in your database by pressing F2 when in the SQL editor to bring up the Tags and Fields window.
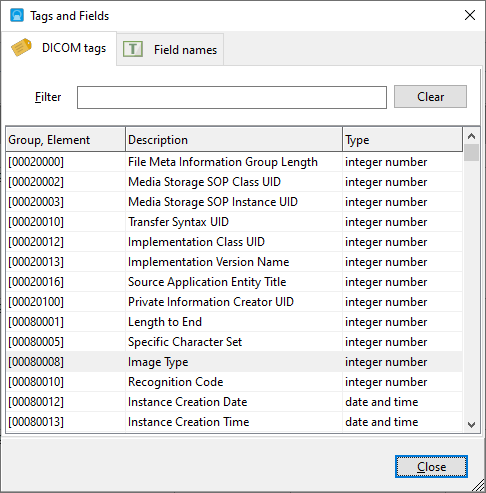
Clicking on any of the tag values will add that value to the SQL editor area, so you do not need to manually enter the tag name.  In addition to the DICOM tags, there are also additional fields that DICOM Search populates in the tags table, as listed in the Field names tab.
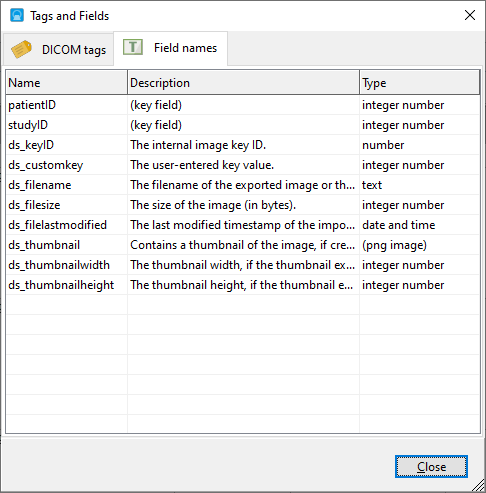
In addition to your key fields, the other fields are used by DICOM Search to maintain a record of the processed images.  For the users, the useful fields are ds_thumbnail and ds_filenameds_thumbnail stores a thumbnail of the image and ds_filename stores the location of the image file when exported from your database, or when processed from your folder.
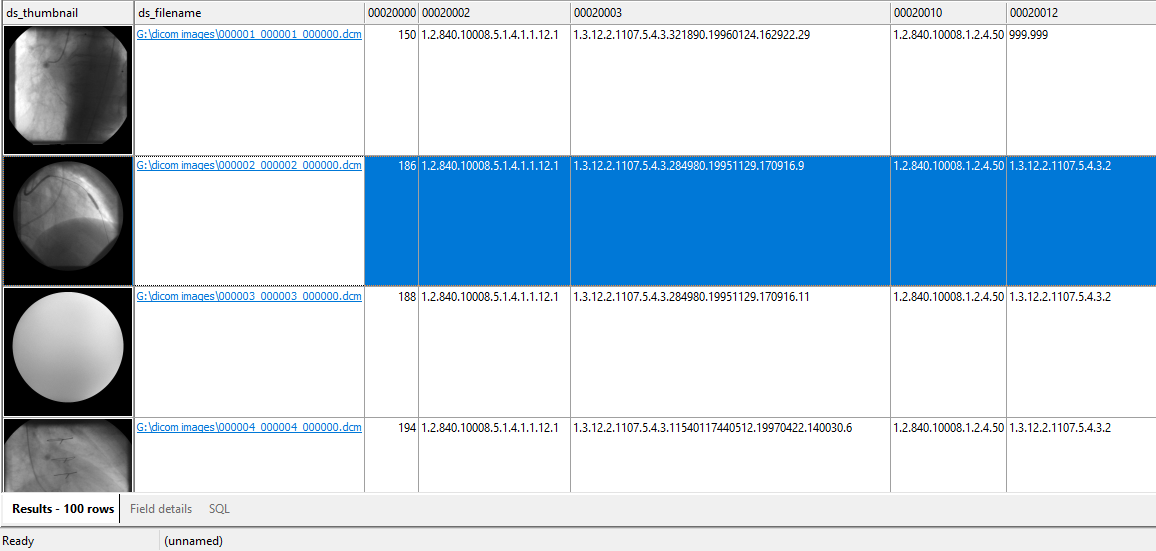
If the listed file name is present on your computer, you can open the image file in your DICOM viewer by double-clicking on the file name in DICOM Search.

Please see this post on how to index and extract images from your database to your computer using DICOM Search, and also how to add thumbnails to the tags database.


SQL syntax

The tag values are stored in a SQLite database, so you will use the SQLite SQL syntax to query the database.  In our example, our key fields are patientID and studyID, so we will always select those columns in case we want to query the source database.  We also select the ds_thumbnail and ds_filename columns to view the image thumbnail, and also have a link to the actual image.

Here are some examples of the types of queries you can run:

  • searching text values
    E.g. the Patient Name (tag group and element 0010,0010):SELECT patientID, studyID, ds_thumbnail, ds_filename FROM tags WHERE [00100010] = ‘Rubo’
  • searching for part of a text value
    E.g. to return all images where the patient name starts with Rubo:SELECT patientID, studyID, ds_thumbnail, ds_filename FROM tags WHERE [00100010] LIKE ‘Rubo%’E.g. to return all images where the patient name contains the word Rubo:SELECT patientID, studyID, ds_thumbnail, ds_filename FROM tags WHERE [00100010] LIKE ‘%Rubo%’

    E.g. to retrieve all images there the patient name ends with Rubo:

    SELECT patientID, studyID, ds_thumbnail, ds_filename FROM tags WHERE [00100010] LIKE ‘%Rubo’

  • searching date values
    E.g. the Study Date tag (tag group and element 0008,0020) for all studies made between Jan 1 1993 and Jan 1 1994:SELECT patientID, studyID, ds_thumbnail, ds_filename, [00080020] FROM tags WHERE [00080020] >= ‘1993-01-01’ AND [00080020] < ‘1994-01-01’Key point is you need to always enter the value you want to search for using yyyy-mm-dd format (year-month-date)
  • searching time values
    E.g. the Study Time tag (tag group and element 0008,0030), for all studies made between 1 PM and 2 PM.SELECT patientID, studyID, ds_thumbnail, ds_filename, [00080030] FROM tags WHERE [00080030] >= ’13:00′ AND [00080030] < ’14:00′Key point is you need to always enter the value you want to search for using hh:mm:ss format (hour:minutes:seconds).
  • searching numbers
    You can use all the usual equality and comparison symbols for numbers e.g. =, >, >=, <, <=E.g. the Intervention Drug Dose tag (tag group and element 0018,0028), where the value is greater than 25SELECT patientID, studyID, ds_thumbnail, ds_filename, [00180028] FROM tags WHERE [00180028] > 25

You can combine multiple conditions using the AND and OR operators e.g.

SELECT patientID, studyID, ds_thumbnail, ds_filename, [00080030] FROM tags WHERE ([00080020] >= ‘1993-01-01’ AND [00080020] < ‘1994-01-01’ AND [00080030] >= ’13:00′ AND [00080030] < ’14:00′) OR ([00100010] = ‘Rubo’)

To sort the results, use the ORDER BY option, and specify the field to sort by e.g. to sort the results by patient name (tag group and element

SELECT patientID, studyID, ds_thumbnail, ds_filename, [00080030] FROM tags WHERE ([00080020] >= ‘1993-01-01’ AND [00080020] < ‘1994-01-01’) ORDER BY [00100010]

To sort in descending order, add the DESC option after the field name e.g.

SELECT patientID, studyID, ds_thumbnail, ds_filename, [00080030] FROM tags WHERE ([00080020] >= ‘1993-01-01’ AND [00080020] < ‘1994-01-01’) ORDER BY [00100010] DESC

To limit the number of rows returned, use the LIMIT option.  For e.g. to retrieve the first 30 rows where the Intervention Drug Dose value is greater than 25, sorted by that field in descending order

SELECT patientID, studyID, ds_thumbnail, ds_filename, [00180028] FROM tags WHERE [00180028] > 25 ORDER BY [00180028] DESC LIMIT 30

See also: