Category Archives: SQL Image Viewer

SQL Image Viewer post processing option

In SQL Image Viewer 9.10, we added an option to allow you to run an application on each exported file.  So say your database contained zip archives, and you use SQL Image Viewer to export those zip archives to disk.  Using the post processing option, you can then use your favorite archiver to extract the files from the zip archives.

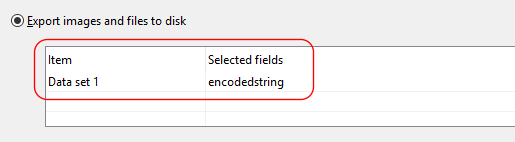
The post processing option is only available when you choose the Export images and files option.

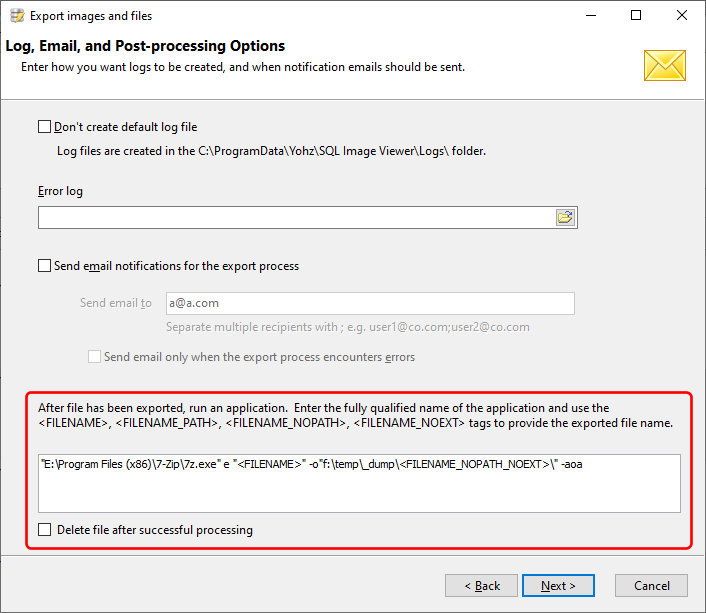
In the export wizard, you will find the option on the Log, Email, and Post-processing Options page.

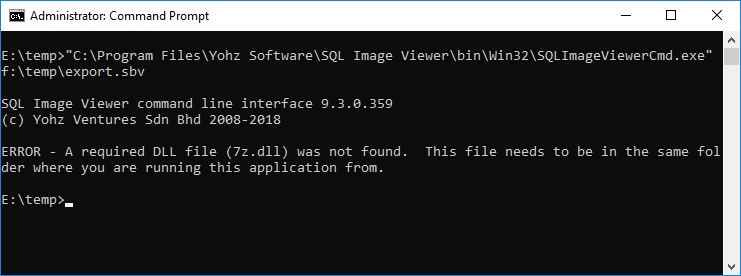
In this example, we will be using the 7zip command-line interface to extract the contents of our zip files.  The most important thing to note here is that whichever application you use, it needs to complete regardless of its execution status.

For example, in 7zip, if a file of the same name already exists, it will prompt you to overwrite or skip the file extraction.

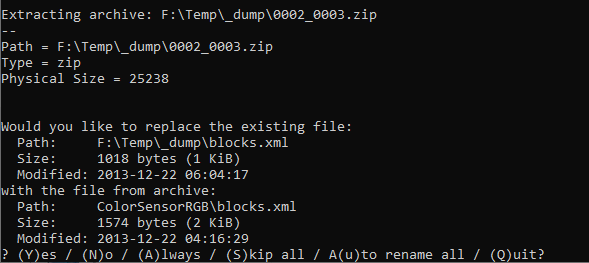
You cannot allow this to happen when running the application from within SQL Image Viewer, because you cannot respond to the application from within SQL Image Viewer, and thus will block the export process.

To prevent this in our example, we use the -aoa flag to choose to always overwrite any existing files.

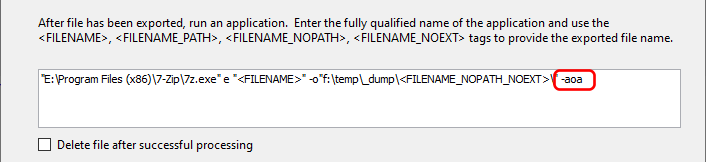
So to run your application, enter the fully qualified name to its executable file.  In our example, that’s E:\Program Files (x86)\7-zip\7z.exe.  Because the path contains spaces, we need to enclose them in double quotes.

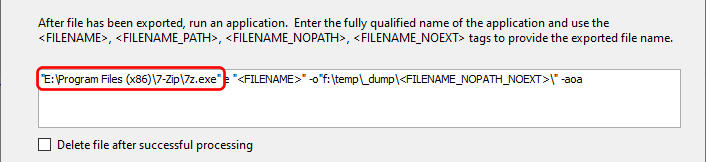
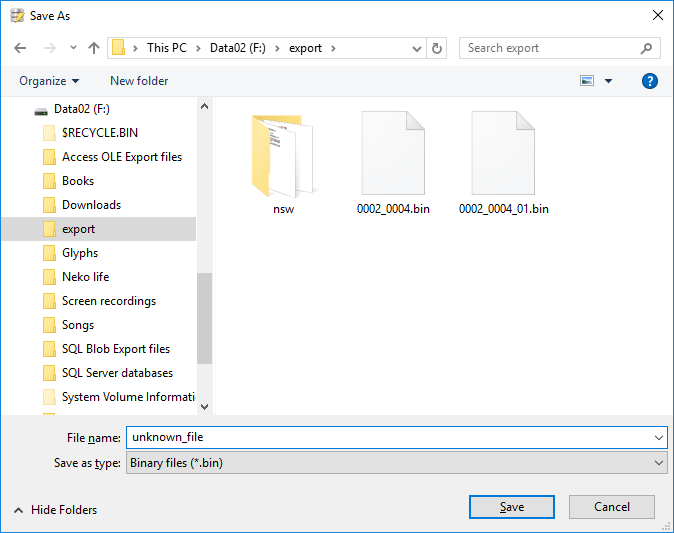
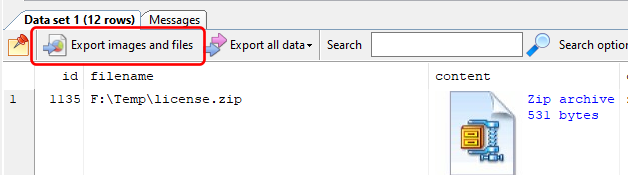
After the executable path name,  enter the required options for your application.  There are 4 tags you can use to represent the exported file to process.  Given a file name of f:\temp\exports\0002_0003.zip:

  • <FILENAME> returns f:\temp\exports\0002_0003.zip
  • <FILENAME_PATH> returns f:\temp\exports\
  • <FILENAME_NOPATH> returns 0002_0003.zip
  • <FILENAME_NOPATH_NOEXT> returns 0002_0003

In our example, we want to extract the files from our zip archive, so we use the e option.  We then need to provide the archive file name, which we do so using the <FILENAME> tag.  Again, we enclose the <FILENAME> tag in double quotes in case it contains spaces.

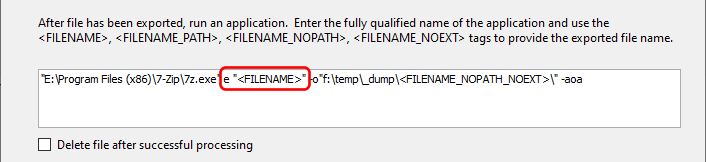
We then want to specify the folder to extract the items into, using the -o option.  In this case, we want to extract the files into a subfolder using the zip file name.  So given a zip file name of f:\temp\exports\0002_0003.zip, the contents of that zip file will be extracted into the f:\temp\_dump\0002_0003 folder.

Now after every zip file has been extracted to disk, SQL Image Viewer will run 7-zip to extract the contents of the zip files.

One last option is the Delete file after successful processing item.  Selecting this will cause SQL Image Viewer to delete the exported files if the processing application returns an exit code value of 0.  Most command line applications do that.  A non-zero exit code usually signifies an error.

We hope you find this option useful.  If you want to use an application that requires some parameters using the input file that’s not provided by any of our tags, drop us a line at support@yohz.com, and we’ll try to help you out.


Connecting to a Microsoft Access (.accdb) database

If you have problems connecting to a Microsoft Access database with the .accdb extension (using SQL Image Viewer, SQL Blob Export or Access OLE Export) and see this error:

there are a few possibilities this error is being raised.

You can connect to that database using Access on the same machine

If you have Access installed on the machine and can connect to the .accdb file without problems, then it’s possible that you are using Microsoft Office 365.

Microsoft Office 365 runs in a self-contained virtual environment, and 3rd party products do not have access to the necessary library files to connect to the .accdb file.  In this situation, you will need to install the Microsoft Access runtime files.  You have the following options:

There is, however, one caveat. You cannot install Office 365 and the above Redistributable/Runtime files of the same major version together (see here). You will have to install the Redistributable/Runtime files of a lower version than your current Office 365 version.

For example, if you have Office 365 in version 2016 installed, you will have to install the ‘Microsoft Access 2013 Runtime’ or ‘Microsoft Access Database Engine 2010 Redistributable’ and not ‘Microsoft Access 2016 Runtime’.

Another possibility is that you already have the Redistributable/Runtime files installed, but you are currently using the wrong version of SQL Image Viewer/SQL Blob Export/Access OLE Export.  All 3 products come in 32-bit and 64-bit versions, and are installed automatically on your computer.  If you only have the 32-bit Redistributable/Runtime files installed on your machine, you will need to use the 32-bit versions of our products; likewise if you have the 64-bit Redistributable/Runtime files installed.

You have never connected to the Access database on the same machine

To connect to the .accdb file, you will need to install the Microsoft Access Runtime/Redistributable files first.  You have the following options:

Usually, you can just download and install the latest version (Microsoft Access 2016 Runtime) to connect to your database successfully.


Merge multiple blobs into a single file

Some applications break up a file into smaller chunks before storing them into a table.  So for e.g. a 200 Kb file might be stored in 4 rows, each storing a maximum of 60 Kb, in the following layout:

ID  fileID  sequence  blobdata
1     201       1              (60 Kb)
2     201       2              (60 Kb)
3     201       3              (60 Kb)
4     201       4              (20 Kb)

When you export the blobs using SQL Image Viewer/Access OLE Export/SQL Blob Export, 4 files will be created using the default settings.  This is because those products treat each row as containing a separate file.

To export the 4 rows as a single file, you need to first select the ‘append to file‘ option for existing files.

This will cause the blob data to be appended to any existing file of the same name.

Next, you need to ensure that the 4 rows will all export to the same file name.  In our example above, we might use the fileID value as the name of the file, so all 4 rows will export to the same file.

Then, your SQL to export the blobs need to sort the rows so that the blobs get appended to the file in the correct sequence.  In our example, this means we need to sort the rows by the sequence value e.g.

SELECT fileID, blobdata FROM mytable ORDER BY sequence

Lastly, we need to ensure that in our output folder, there are no existing files of the same name, otherwise our blobs will get appended to those files.

That’s basically all you need to do to ensure that the blobs are exported in the correct sequence to a valid file.  In summary:

  • select the append to file option for existing files
  • use a naming convention that ensures the related blobs use the same file name
  • sort the rows in the correct sequence so that the blobs are appended in the correct order
  • before the export, ensure that no files of the same name are already in the output folder

Running the SQL Image Viewer command line interface in batch files

The SQL Image Viewer Professional Edition includes a command-line interface that you can use to run your export jobs unattended.  If you use batch files to run your export jobs, you would need to ensure that the working directory is folder where the SQL Image Viewer command-line executable (SQLImageViewerCmd.exe) is located.

So say the executable files are located in this folder:

Our batch file (which is in another folder) calls the executable, and provides the export definitions as the first parameter.

This is the error that will be raised when we run the batch file.

This is because the working directory is the folder where the batch file is located.  To fix this issue, use the CD command with the /N flag in the batch file to set the working directory to the SQL Image Viewer folder i.e.

In this way, when SQL Image Viewer runs, it can find all the files that it requires to run successfully.

SQL Image Viewer 9.1 and PDF files

SQL Image Viewer 9.1 can now display thumbnails of PDF files in your result sets.  You do not need to change or add your configuration – simply run your query and if any PDF files are detected, a thumbnail of the first page is displayed in the results area.

Using custom layouts (available only in the Professional Edition), you can display additional pages from your PDF files.

As of now, SQL Image Viewer can only display thumbnails of your PDF files if they are stored as-is in your database.  Thumbnails cannot be displayed for PDFs that are stored in OLE-Object containers, zip archives, or any other format that embeds the PDF file in it.


Why is SQL Image Viewer not displaying details of my blobs

If you are using a third-party application to upload images and/or files into your database, and SQL Image Viewer cannot identify the image or file type, then there’s a high probability that your application has modified the data.

Examples of such applications include the MAZE School Information System and the Financial Edge system by Blackbaud.  We had a user who had the following data stored in their Financial Edge database.  In SQL Image Viewer, the following is displayed:

SQL Image Viewer is unable to identify the data that’s stored in the fields (they’re actually PDF files).  If we look at the data using the SQL Image Viewer hex viewer:

we can see that the OLE wrapper (or the original source data) begins at offset 32.  This means that Financial Edge has added 32 bytes of data to the beginning of the original file, which is why SQL Image Viewer does not recognize the file format.

To identify and extract the data correctly, we need to skip the first 32 bytes, so that we only retrieve the original source file.  In SQL Server, we can use the following syntax:

Now, SQL Image Viewer is able to identify the file type correctly.

Ok, admittedly not everybody knows what an OLE wrapper looks like, or any of the other file headers, which is why if SQL Image Viewer cannot identify your blobs, please send us a couple of samples to analyze.  We need the data exactly as stored in your database, so to extract the data, please perform the following steps and send us the resulting files.

Select the column containing the unidentified blob data.

Right click the mouse button to bring up the context menu, and select the ‘Save item’ option.

Enter a file name, save the blob data, and send the file to us at support@yohz.com.

The same issue applies to Access OLE Export and SQL Blob Export too.  If these products cannot identify the file type because the original files have an additional header, they will be exported with a .bin extension.  Please send us a couple of those .bin files to analyze, or you can also use SQL Image Viewer to retrieve the data and follow the steps above to send us the samples.

SQL Image Viewer 9 and custom layouts

We just released SQL Image Viewer 9 with support for custom layouts.  Custom layouts allow you to customize how your data is displayed.  Take for example this default layout:

You see some textual values, and thumbnails of images from the result set.  Using custom layouts, the result could be displayed this way for production staff:

or in this layout for sales staff:

You can pretty much lay out every piece of data in any manner you want, depending on your needs.

Custom layouts can also display multiple frames from a single DICOM, TIFF, or GIF image.  Here is a custom layout showing frames from DICOM images:

Here is another image showing how custom layouts can be used for verification purposes.  In this example, the user wants to verify the scanned values against the actual values on the cheques, so a custom layout is used to place the scanned values right next to the cheque values.

Take a look at the videos describing custom layouts in detail:

  • how to create custom layouts
  • how to display multi-frame images
  • how to easily verify data from scanned images using custom layouts

Let us know how you’re using custom layouts, and how we can improve this further.  Do drop us a line at support@yohz.com with any suggestions or comments.  Thank you.

# Note that custom layouts is only available in the Professional Edition of SQL Image Viewer.

Exporting base64 encoded values in your databases

We recently had a prospect that had issues exporting her data using SQL Image Viewer.  She kindly sent a sample of the data, and it turned out that it was a base64 encoded string stored in a memo field.

So we got to work and now, SQL Image Viewer can decode base64 encoded data stored in memo fields.  It will recognize most image and binary file types.  For example, this is the result returned by Management Studio for a query that retrieves a base64 encoded PDF file:


This is the result returned by the same query in SQL Image Viewer:


You can immediately identify the type of data that’s stored in your database.  When you want to export the file, ensure that you select the memo field:


and also the Extract base64 encoded values in memo fields option:


For now, SQL Image Viewer will not inspect binary blob fields for base64 encoded data, as it wouldn’t make sense to store text values in a binary fields.  However, if you do find yourself in such a situation, do drop us a line at support@yohz.com.

Download a trial of SQL Image Viewer now, or buy a license from only USD 45.

Compressing PDFs in your database

→ This article refers to SQL Blob Viewer, which has now been renamed to SQL Image Viewer.  The techniques described in this blog is still applicable, as the functionality of the product remains the same.  Only the name has changed.

Recently, a user wanted to compress PDFs stored in his database, in order to reduce the overall size of the database.  He asked if we had any application that could do this.  Unfortunately, we don’t, but it got me to exploring the available options.

Turns out that PDF software development kits aren’t cheap at all.  Licensing can run into thousands of dollars, which isn’t feasible for us.  Open-source software is another option, which is what I finally went with.  In this case, I used Ghostscript, an all-purpose PDF toolkit, available at https://www.ghostscript.com/.

There are 3 steps to compressing PDFs in your database – extracting the PDFs, compressing or optimizing them, and finally uploading them back into the database.  We will use SQL Blob Viewer to first extract the PDFs, then Ghostscript to reduce the PDF size, and finally SQL File Import to upload the PDFs back into the database.  For reference purposes, these PDFs were created from document scans, so they have a 600 dpi resolution and are not optimized for PDF storage.  We’re running this example on Windows, but there is also a Linux version of Ghostscript, and both SQL Blob Viewer and SQL File Import will run on Linux using Wine.


Extracting the PDFs

Extracting PDFs from your database using SQL Blob Viewer is very simple – first write the SQL command to retrieve the PDFs.

We then export the PDF files to disk, using the primary key value in the ID field to name the exported files.  We do this so that when we upload the compressed files, we can use the ID value to update the correct rows.

If you have a lot of PDFs to export, you should choose to retrieve only the first few rows, to avoid loading the entire data set into memory.  After that, when you export the result set, the entire result set will be exported.  See this page for details on how to export large result sets with SQL Blob Viewer.


Compressing the PDFs

Now that we’ve exported the files, it’s time to use Ghostscript to compress the images found in those PDFs.

The easiest way to do this is to reduce the resolution of the images.  You can do this using the PDFSETTINGS option.  The possible values are:

  • /screen – converts to 72 dpi
  • /ebook – converts to 150 dpi
  • /printer – converts to 300 dpi
  • /prepress – converts to 300 dpi, color preserving

Depending on your requirements, you might want to test the various options to see which best suits your needs.  I took one of the exported PDFs, and converted them using each of the 4 options.  As you can see, the size of the PDF drops dramatically for all 4 options.

Here is the DOS batch script I used to convert the PDFs using the /prepress option (NOTE: Ghostscript options are case-sensitive, so you cannot for e.g write -PDFSETTINGS as -PDFSettings):

for %%x in (*.pdf)  do gswin64c.exe -sDEVICE=pdfwrite -dPDFSETTINGS=/prepress -dBATCH -dNOPAUSE -dQUIET -SOutputFile=”%%~nx_compressed.pdf” %%x

The options used are:

  • -sDEVICE=pdfwrite – this tells Ghostscript that we want to create a PDF file
  • dPDFSETTINGS=/prepress – this tells Ghostscript to convert all images found in the source PDF to 300 dpi resolution
  • -dBATCH -dNOPAUSE -dQUIET – these options indicate that the process should run non-interactively
  • -SOutputFile=’%%~nx_compressed.pdf’ – this tells Ghostscript how to name the output file.  Since we want to add a _compressed suffix, we first use the ~nx option to extract just the source file name without the extension, add the _compressed suffix, followed by the .pdf extension.
  • %%x – this is the source file name that matches the search pattern in the for %%x in (*.pdf) loop

Basically, this loops through all the PDFs in the current folder, converts all images in each PDF to 300 dpi, and saves the PDF with the _compressed suffix.

As you can see, the new PDFs are significantly smaller than the original PDFs.


Updating the database

Now, we need to update the existing record with the optimized PDF file.  We can do this using SQL File Import.  First, we enter the search pattern for the files we want to use i.e. those with the _compressed suffix.

Next, we need to map the columns.  Using the file name as the input value for the ID column, we need to:

  • extract the ID value from the file name
  • indicate that this value is a key field
  • indicate that this is an update process

We do this via the following script:

For the attachment column, we simply indicate to SQL File Import that we want to use the file contents.

Internally, SQL File Import will form the following UPDATE statement based on our script as follows:

UPDATE attachments SET attachment = :attachment WHERE ID = :ID

The test script shows that we have extracted the ID value correctly, and that the attachment column will use the contents of the files.

Now, we just need to run the script in SQL File Import, and our records are updated with compressed versions of the PDF files.

That is basically all you need to do if you want to reduce the size of the PDFs in your database.  The steps are similar if you want to process any of your blob data and update them in your database e.g.

  • resize images
  • compress files into archive (zip) files
  • process images e.g. add watermarks, convert to grayscale etc

SQL Blob Viewer and SQL File Import will handle the extraction and update process respectively.  You are free to use any external tools to process your images/files.

Exporting and extracting images and files from Microsoft Access databases

Using OLE Object column types, there are 3 ways you can store images and files in a Microsoft Access database, or in a database (e.g. SQL Server) used by a Microsoft Access front-end.

  • embedding

Embedding involves creating the image/file directly using the associated OLE Server application.  For example, if I choose to embed a bitmap image, Access will open Paint for me to create my bitmap image, and save that image into that field.

  • insert from a file

If you already have the image/file you want to store in your database, you can insert the file into your Access database directly using the Create from File option.  Access then copies the file into the field.

  • link to a file

Similar to the above, but this time, the image/file is not stored in the database.  Access just creates a link to the external file, much like a hyperlink in your browser.

If you store your images/files using the first 2 methods, then Microsoft Access adds additional data to your image/file, so that it knows which application to use to open that particular image/file.  This means that if you extracted the data from your database, it will appear different from your original file.

For example, let’s insert an image into an OLE Object field.  The image file is 18.7 Kb in size.

Once inserted into the Access database, the size has increased to 19.192 Kb.

The increase is due to the additional data added by Access.  If you now extract the data as is from the database, it cannot be opened by Paint because of the additional data.  The PNG data is preceded by OLE headers.

This is a common issue faced by Microsoft Access users – when they want to extract images and files from OLE Object fields to their original format, there isn’t a way they can do this easily.  Every image/file has been modified by Access.  You have to open each image/file in Access, then save the item to disk manually.

This is the reason we created Access OLE Export.

In just 4 simple steps, Access OLE Export will extract and export your embedded images and files to disk, stripping out the additional data added by Access.  The exported images and files can then be opened ‘normally’, using the appropriate application.

If you require more control over what is exported, SQL Image Viewer is another option.  SQL Image Viewer allows you to inspect your data before exporting them, but requires that you be able to write SQL scripts.

There may be situations where both products are unable to identify embedded images correctly.  This may be because the registered OLE Server for that content type is not yet supported.  In these cases, send us (at support@yohz.com) a sample of the embedded data, and we will add support for that OLE server type.

Download a FREE 14-day trial of Access OLE Export or SQL Image Viewer now to extract embedded objects from your Access databases the easy way.

If instead you need to insert or update OLE-Object data in your databases, have a look at Access OLE Import.  Using Excel spreadsheets as the input data, you can easily add and update your embedded or linked OLE-Object data.

You can purchase our products on this page.

See also: